CCH® SureTax® for Microsoft Dynamics 365 Business Central User Guide
Updated: July 02, 2024
Welcome to CCH® SureTax®
CCH SureTax for Dynamics 365 Business Central is a plug-in for Dynamics 365 Business Central that helps you accurately calculate sales tax for the United States and Canada. The plug-in includes components that can be purchased and installed separately:
- The Sales component integrates with the Sales module of Dynamics 365 Business Central.
- The Purchasing component integrates with the Purchasing module of Dynamics 365 Business Central.
- The Services component integrates with the Service module of Dynamics 365 Business Central.
- CCH SureAddresshelps you accurately validate addresses throughout the Sales, Purchasing, and Service modules.
Scope of this User Guide
This guide provides guidance for Dynamics 365 Business Central administrators and users. It assumes that the reader knows how to find and open common pages in these Dynamics 365 Business Central modules. Information about using Dynamics 365 Business Central pages is limited to specific instructions for using the CCH SureTax features on those pages.
Some information about installing and configuring your installation is included in this guide. However, the guide does not contain detailed technical specifications and is not a substitute for the expertise of your CCH Training and Consulting representative or a Dynamics 365 Business Central specialist.
Conventions Used in this Guide
To help you locate and interpret information, consistent visual cues and a standard vocabulary are used throughout this guide. These conventions are described below.
- Bold facing is used in procedures to indicate a specific item in the program that you must select, enter, or otherwise act upon. For example: Select Finish to exit the wizard.
- The greater-than symbol (>) is used to indicate the sequence of menus or folders to navigate through to reach a particular location. For example: Select Sales > Order Processing > Orders to open the sales order page.
- Italics are used to identify the names of the pages, tabs, sections of pages, and fields. For example: In the Default order-approval address section, enter the address to be used for order approvals.
- To distinguish between the subparts that make up the SureTax plug-in and Dynamics 365 Business Central, different labels are applied to these items. The word "component" is used to identify subparts of the SureTax plug-in, while the word "module" is used to describe subparts of Dynamics 365 Business Central.
Installation And Basic Configuration
Overview
CCH SureTax for Microsoft Dynamics 365 Business Central is a plug-in that integrates the CCH SureTax solution with Microsoft Dynamics 365 Business Central. With CCH SureTax for Microsoft Dynamics 365 Business Central installed, you can accurately calculate sales tax for the United States and Canada and manage your sales tax compliance without the need to maintain sales tax rates inside Dynamics 365 Business Central.
The CCH SureTax for Microsoft Dynamics 365 Business Central product includes four components that can be installed separately:
- Sales. Allows you to manage your sales tax compliance in the Sales module of Dynamics 365 Business Central.
- Purchasing. Allows you to manage your sales tax compliance in the Purchasing module of Dynamics 365 Business Central.
- Services. Allows you to manage your sales tax compliance in the Service module of Dynamics 365 Business Central.
How It Works
When you compute the sales tax on a transaction in Microsoft Dynamics 365 Business Central, the CCH SureTax for Microsoft Dynamics 365 Business Central plug-in sends the transaction information from Dynamics 365 Business Central to the web services. The calculated sales tax is returned to Dynamics 365 Business Central. If needed, you can view the results of the CCH SureTax calculation before posting the transaction.
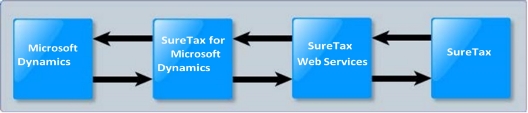
Figure 1: Information flow when using the CCH SureTax for Microsoft Dynamics 365 Business Central plug-in.
Features
With CCH SureTax for Microsoft Dynamics 365 Business Central, you can do the following:
- Supports the Microsoft Dynamics 365 Business Central web clients.
- Manage sales tax for transactions created on any of the following Microsoft Dynamics 365 Business Central pages:
- Sales Pages
- Sales Quote
- Sales Order
- Sales Invoice
- Blanket Sales Order
- Sales Return Order
- Sales Credit Memo
- Purchase Pages
- Purchase Quote
- Purchase Order
- Purchase Invoice
- Blanket Purchase Order
- Purchase Return Order
- Purchase Credit Memo
- Services Pages
- Service Quote
- Service Order
- Service Invoice
- Service Credit Memo
- Sales Pages
- Input separate addresses for each line item in a transaction.
- Select exemptions at the line-item level.
- Enable or Disable SureTax at the line-item level.
- Select different posting accounts for each tax jurisdiction as needed using the state-level tax area codes.
- Display detailed results of the sales tax calculation with the CCH SureTax Tax Results page.
- Import system data through CCH SureTax Web services.
- Log and review all data exchanged between Business Central and the SureTax API during the current user session for tracking and analysis.
Limitations
All addresses must use the 2-digit ISO code for US states and Canadian provinces.
Installing the CCH SureTax for Microsoft Dynamics 365 Business Central Plug-Ins
CCH SureTax for Microsoft Dynamics 365 Business Central has four components available:
- Sales. Provides tax calculation for transactions processed through the Sales component in 365 Business Central.
- Purchase. Provides tax calculation for transactions processed through the Purchasing component in D365 Business Central.
- Service. Provides tax calculation for transactions processed through the Service component in D365 Business Central.
- AV. Provides address validation for the Sales, Purchasing, and Service component in D365 Business Central.
On-Premise Installation
If you are installing the plug-in in a Business Central version prior to v15.0, you will need to import the “subform_mods.fob” or the “subform_mods.txt” file before installing the .app files.
The plug-in is provided as .app packages. The sales, purchase, and service components also contain a base component, which is shared between them. If multiple plug-in components are installing, the base .app package must only be installed once. The base .app package must be installed before the sales, purchase, or service .app package can be installed. Follow all best practices from Microsoft when installing .app packages.
Cloud Installation
For each SureTax extension to be installed, you will need the AppSource ID, which can be obtained from your sales representative. Once you have obtained the necessary AppSource IDs, do the following:
- Open Dynamics 365 Business Central in a web browser and log in.
- Append the following to the base Dynamics 365 Business Central URL:
?aid=FIN&page=2503&filter=%27ID%27%20IS%20%27
%27&signInRedirected=1 - Select to install the extension.
Basic Setup
The following sections contain information about the basic setup that you must perform before you can use CCH SureTax for Microsoft Dynamics 365 Business Central to calculate sales tax.
Before You Set Up
We recommend that you review the information in this section before attempting to set up the CCH SureTax for Microsoft Dynamics 365 Business Central plug-in.
Configuring Company-Level Settings
The SureTax Company Setup page allows you to configure the CCH SureTax for Microsoft Dynamics 365 Business Central settings that apply for the company. To configure plug-in settings, do the following:
- Search for and select the SureTax Company Setup page.
- Select the General tab and configure the following settings:
- SureTax URL. Enter the URL for CCH SureTax tax calcultation requests.
- Data API URL. Enter the URL for importing CCH SureTax system data.
- SureTax Client ID. Enter the Client ID for SureTax tax calculation requests.
- SureTax Validation Key. Enter the Validation Key for SureTax tax calculation requests.
- Note: For security reasons, the validation key will be hidden after it is entered.
- Recalculate SureTax Settings on Copy. When selected, SureTax settings for a line will be recalculated when a document is copied with the Recalculate Lines option selected.
- Allow Multiple Entities. When enabled, new Multiple Entity Setup tab will be available below Tax Setup tab to configure multiple client entities.
- Note: The feature allows user to consider a SureTax client out of multiple SureTax clients for tax calculation.
- Note: When enabled, Dimension Code and Dimension Value from Multiple Entity Setup needs to be added in transactions to consider the corresponding SureTax client for tax calculation.
- Select the Tax Setup tab and configure the following settings:
- Default Tax Account (Sales). Configure default tax account for sales
- Default Tax Account (Purchase). Configure default tax account for purchase
- Default Reverse Charge (Purchase). Configure default reverse charge account for purchase
- SureTax Tax Area Code Prefix. Configure the Prefix for SureTax Tax Area Codes
- SureTax Tax Group Code. Configure the Tax Group Code for SureTax
- Note: We recommend that you create a new Tax Group code specifically for the CCH SureTax plug-in.
- Select the Multiple Entity Setup tab and configure the following settings:
- Note: Multiple Entity Setup tab will be available only if Allow Multiple Entities is selected in the General tab.
- Note: The section is used to configure multiple SureTax clients for tax calculation.
- SureTax Company Code. Enter the SureTax Company Code for the entity.
- SureTax Client ID. Enter the Client ID for SureTax tax calculation requests.
- SureTax Validation Key. Enter the Validation Key for SureTax tax calculation requests.
- Note: For security reasons, the validation key will be hidden after it is entered.
- Dimension Code. Enter the Dimension Code for the entity.
- Dimension Value. Enter the Dimension Value for the entity.
- Select the Validate Credentials action to validate the SureTax Client ID and Validation Key.
- Select the Import System Data action to import system data necessary to use the plug-in.
- Close the setup page.
- Update the Tax Group Code for all Items to the CCH SureTax Tax Group Code.
Tax Area Code and Jurisdiction Setup
When data is imported through SureTax Company Setup page, tax area codes and jurisdictions are created for each state and province in the United States and Canada. Tax area codes and jurisdictions are also created for each country. The tax accounts selected on the SureTax Company Setup page are assigned to each newly created tax jurisdiction.
To simplify configuration, a dummy tax area code is created with the tax area code prefix on the SureTax Company Setup page followed by an underscore. This dummy tax area code may be assigned to all customers, customer addresses, locations, and vendors. When an order or line is created or tax is calculated, the tax area code will then be updated to the appropriate state or country-specific tax area code.
At the time of tax calculation, additional tax jurisdictions are created for each tax line returned by SureTax. The tax jurisdiction ID will be composed of the tax authority ID, tax type, and tax category returned by SureTax. These additional tax jurisdictions will inherit the tax account setup from the country or state-level tax jurisdiction that the authority belongs to. At
the time of posting, the tax amounts are assigned to each jurisdiction based on the authority returned by SureTax. This permits the user to post tax to the general ledger at any level of desired granularity.
Tax Posting Setup Configuration
To function correctly, the plug-in requires that the VAT Calculation Type on Business Central transactions is set to Sales Tax. To do this, navigate to the Tax Posting Setup page and create/modify the appropriate rows to ensure the VAT Calculation Type is Sales Tax. The simplest way to do this is to have a single record on the page where the VAT Bus. Posting Group is blank, VAT Prod. Posting Group is blank, and VAT Calculation Type is Sales Tax.
Transaction Synchronization
Due to technical limitations, invoices may occasionally be posted in Business Central without the corresponding transaction being finalized in SureTax. The SureTax Transaction Synchronization page allows you to synchronize transactions between Business Central and SureTax. To synchronize transactions, do the following:
- Search for and select the SureTax Transaction Synchronization page.
- Enter the Company Code if you have multiple entities configured in the SureTax Company Setup page.
- Enter the start date for the time period that you want to synchronize.
- Enter the end date for the time period that you want to synchronize.
- Click Compare Transactions to search for posted invoices or credit memos in Business Central that do not have a corresponding finalized transaction in SureTax. This process will be created as a background process as it may take a long time to process for a large transaction volume.
- Click Check Status to check the status of the transaction synchronization background process.
- Note: You may need to refresh the page to see the latest data in the transaction list.
- Select one or more transactions that should be finalized in SureTax.
- Note: You can delete record(s) from the transaction list if the transaction(s) should not be sent to SureTax.
- Select Correct Transactions to send the selected transactions to SureTax to be finalized.
A history page is available to view transactions that have been synchronized. Search for and select the SureTax Transaction Synchronization History page to view transactions that have been previously synchronized.
Log and Review Transactional Data
All data exchanged between Business Central and the SureTax or SureAddress APIs is temporarily stored in session-based tables. This information is only accessible to the current user during their session and will be lost once the session expires. Each user can view only their own session history.
SureTax Log Entries
The SureTax Log Entries feature is always enabled and available in the Sales, Purchase, and Service modules.
Accessing the Log Use the search box to find and open the SureTax Log Entries page.
Log Entry Fields:
- Id – A unique identifier for the log entry
- Name – Indicates whether the entry is a Request or Response
- Description – A brief summary of the associated API call
- Document No. – The document number related to the tax calculation
- Has Value – A boolean flag indicating whether the request/response body is stored
- Created At – The timestamp of when the transaction occurred
Available Actions:
- Download Entries – Allows the user to export selected log entries as a ZIP archive
- Clear Log – Removes all log entries for the current user session
NOTE: All entries are session-specific and only available to the current user. Data is automatically cleared when the session ends.
SureAddress Log Entries
The SureAddress Log Entries feature is available exclusively within the Address Validation (AV) module.
By default, this feature is disabled. To enable it, go to the SureAddress Address Validation Setup page and select the Enable SOAP Tracing option.
Accessing the Log Use the search box to find and open the SureAddress Log Entries page.
Log Entry Fields:
- Id – A unique identifier for the log entry
- Name – Indicates whether the entry is a Request or Response
- Description – A brief summary of the associated API call
- Document No. – The document number related to the tax calculation
- Has Value – A boolean flag indicating whether the request/response body is stored
- Created At – The timestamp of when the transaction occurred
Available Actions:
- Download Entries – Allows the user to export selected log entries as a ZIP archive
- Clear Log – Removes all log entries for the current user session
NOTE: All entries are session-specific and only available to the current user. Data is automatically cleared when the session ends.
Configuring and Using the CCH SureAddress Component
Overview
The SureAddress component of the plug-in integrates with multiple components of D365 Business Central, enabling addresses to be validated individually or in bulk. The D365 Business Central pages for which address validation is available are as follows:
- Company Information
- Location Page/List
- Customer Page/List
- Vendor Page/List
- Ship-to Address Page/List
- Order Address Page/List
- Bank Account Page/List
- Contact Page/List
- Responsibility Center Page/List
- Sales Quote, Order, Invoice, Credit Memo, Return Order, Blanket Order
- Purchase Quote, Order Invoice Credit Memo, Return Order, Blanket Order
- Service Quote, Order, Invoice, Credit Memo
- Job Page/List
This chapter details how to configure the SureAddress component and use it to validate addresses individually and in bulk.
Configuring the SureAddress Component
The SureAddress Validation Setup page allows you to configure settings for the SureAddress component of the plug-in. Open this page by searching for and selecting the SureAddress Validation Setup page. To configure the address validation component, do the following:
- Select the General tab and configure the following settings:
- Address Validation URL: Enter the URL for the SureAddress webservices URL.
- Address Client ID: Enter the SureAddress client ID.
- Address Validation Key: Enter the address validation key for the supplied client ID.
- Note: For security reasons, the validation key will be hidden after it is entered.
- Min. Address Validation Score: Enter a value between 0 and 1 for the minimum score necessary for returned addresses to automatically be accepted during batch validation and to be displayed during individual validation.
- Note: Recommended value is 0.95.
- Disable Automatic Validation: Select this if you want to disable the address validation that occurs when a record is saved. When this is selected, the only way to validate addresses is to select the page actions for address validation.
- Select the Country tab and configure the following settings:
- Validate Blank Country: Select this if you want to validate addresses when the country field is blank.
- Select the Countries to validate tab and configure the following settings:
- Countries to validate List: Enter values in this list for the country codes to validate. If an address contains a country code that is not present in this list, then it will not be sent to SureAddress.
- Select the Logging tab and configure the following settings:
- Enable SOAP Tracing: Select this if you want to log the webservice calls being made to SureAddress.
- Select the Validate Credentials action to validate the Address Client ID and Address Validation Key.
Individual Address Validation
You can perform individual address validation with this plug-in on various pages in Dynamics 365 Business Central.
- For supported pages, you can validate individual addresses by selecting Actions > Address Validation, or by selecting Save for automatic validation. The CCH Address Validation page displays the Original and Validated Address.
- On the CCH Address Validation page, select Accept to accept the validated address, or select Reject to continue with the Original Address.
Batch Address Validation
You can perform batch address validation on list pages within Dynamics 365 Business Central. To perform batch validation, do the following:
- Select one or more records in a list.
- Select Actions > Validate > Address Validation Batch.
- A progress bar will display address validation progress.
When all records have been processed, a message box will indicate the number of processed and updated records.
An address is only updated if a matching address is returned that scores above the minimum threshold defined on the CCH Address Validation Setup page.
- The CCH Address Validated field has been added to each list and indicates whether a given record has been validated and updated. User needs to set the SessionTimeout in the navsettings.json file up to 24:00:00 hrs.
Configuring and Using the Sales Component
Overview
The Sales component of the CCH SureTax for Microsoft Dynamics 365 Business Central plug-in integrates with the Dynamics 365 Business Central Sales module. The Dynamics 365 Business Central Sales pages for which CCH SureTax can calculate tax are as follows:
- Quotes
- Orders
- Blanket Orders
- Return Orders
- Invoices
- Credit Memos
The first half of this chapter explains how to configure the options that impact the Sales component. The setup process includes setting defaults on some standard Dynamics 365 Business Central pages.
The second half of the chapter, titled Using the Sales Component, includes information about using CCH SureTax options when entering transactions into Microsoft Dynamics 365 Business Central. This section also describes how to view sales taxes prior to posting and how to post the sales tax transactions.
Configuring the Sales Component
Configuring Sales Settings for Company
The SureTax Sales Setup page allows you to configure CCH SureTax settings for the company that apply to the sales module.
To configure sales settings, do the following:
- Search for and select the SureTax Sales Setup page.
- Select the General tab and configure the following settings:
- Enable SureTax. Enables the plug-in to calculate tax in the sales module.
- Disable Automatic Tax Calculation. Selecting this will reduce the number of tax calculation calls made to SureTax. Tax calculation will only be performed when explicitly called for.
- Calculate Tax During Printing. Selecting this will trigger SureTax tax calculation when a document is printed.
- SKU Option. Select whether to send the transaction type code or SKU to identify items.
- SureTax Billing Address. Determines what address gets sent to SureTax for billing address. Options are:
- Bill-to Address.
- Sell-to Address.
- Ship-to Address.
- Exempt Code Type. Determines Sell-to Customer No. or Bill-to Customer No. gets sent to SureTax for exemption processing. Options are:
- Sell-to Customer.
- Bill-to Customer.
- Select the Defaults tab and configure the following settings:
- Default Regulatory Code. Enter the default regulatory code to be used on sales transactions.
- Default Sales Type Code. Enter the default sales type code to be used on sales transactions.
- Default Tax Situs Rule. Enter the default tax situs rule to be used on sales transactions.
- Default Transaction Type Code. Enter the default transaction type code to be used on sales transactions.
- Default Tax Exemption Code. Enter the default tax exemption code to be used on sales transactions.
- Default Exempt Reason Code. Enter the default exempt reason code to be used on sales transactions.
Configuring Data Exchange for Sales
The SureTax Sales Data Exchange Setup page allows you to configure which fields are sent from Business Central to SureTax for sales documents.
To configure data exchange for sales, do the following:
- Search for and select the SureTax Sales Data Exchange Setup page.
- Select the sales document type.
- Select the data exchange field that specifies which SureTax API field the data will be sent.
- Select either a Business Central table and field name to send data from a specific field or enter static text to send a text value.
Configuring Settings for Customer
CCH SureTax settings are added to the Dynamics 365 Business Central Customer page. Use the following procedure to override the CCH SureTax sales type code for specific Dynamics 365 Business Central customer accounts.
- Open the customer page for the customer that you are modifying settings for.
- Expand the CCH SureTax tab.
- In the SureTax section, select options for the following field:
- SureTax Sales Type Code. Your selection will override the default Sales type code selected on the SureTax Sales Setup page on transactions for this customer.
- SureTax Regulatory Type Code Your selection will override the default Regulatory type code selected on the SureTax Sales Setup page on transactions for this customer.
- SureTax Exemption Code. Your selection will override the default exemption code selected on the SureTax Sales Setup page on transactions for this customer.
- SureTax Exempt Reason Code. Your selection will override the default exempt reason code selected on the SureTax Sales Setup page on transactions for this customer.
- SureTax Tax Included Code. Your selection will act as the default tax included code on transactions for this customer.
- Close the customer page to save your changes.
Setting CCH SureTax Customer Exemptions
SureTax customer exemptions can be managed within Business Central, allowing users who don’t have access to SureTax to manage customer exemptions. Use the following procedure to add, modify, or delete SureTax customer exemptions:
For individual Customers -
- Open the customer page for the customer that you are modifying exemptions for.
- Select SureTax Customer Exemptions under the Actions menu. The page displays a list of existing exemptions in SureTax for the customer.
- Select Company Code if you have multiple entities configured in the SureTax Company Setup page.
- Add, edit, or delete exemptions by adding, modifying, or deleting the rows in the page.
- Close the page or switch to another row to synchronize the exemptions with SureTax.
For multiple Customers -
- Search for and select the CCH SureTax Customer Exemptions page.
- Select the Company Code if you have multiple entities configured in the SureTax Company Setup page.
- Select the SureTax Exemptions > No. for the customers that you are modifying exemptions for. Multiple customers can be selected as pipe-separated values.
- Select OK. The SureTax Customer Exemptions page displays a list of existing exemptions in SureTax for the customers.
- Select Import/Export to import or export SureTax customer exemptions. -- Note: New exemptions can be added by importing a file with the new exemptions.
Configuring Settings for Customer Ship-to Address
CCH SureTax settings are added to Dynamics 365 Business Central Customer Ship-to Addresses. Use the following procedure to set the CCH SureTax transaction type code for specific Dynamics 365 Business Central Customer Ship-to Addresses.
- Select the Customer Ship-to Address that you are modifying settings for.
- Select options for each of the following fields:
- SureTax Exemption Code. Your selection will override the default exemption code selected on the SureTax Sales Setup page on transactions for this customer. This exemption code will override any exemption code selected for the customer when the ship-to code is specified on a transaction.
- SureTax Exempt Reason Code. Your selection will override the default exempt reason code selected on the SureTax Sales Setup page on transactions for this customer. This exempt reason code will override any exempt reason code selected for the customer when the ship-to code is specified on a transaction.
- Close the Customer Ship-to Address page to save your changes.
Configuring Settings for Items
CCH SureTax settings are added to the Dynamics 365 Business Central items page. Use the following procedure to set the CCH SureTax transaction type code for specific Dynamics 365 Business Central items.
- Open the Item page for the item that you are modifying settings for.
- Expand the CCH SureTax tab.
- Select options for each of the following fields:
- SureTax Transaction Type Code. Your selection will override the default Transaction type code selected on the SureTax Sales Setup and customer pages on transactions for this item.
- SureTax Regulatory Type Code Your selection will override the default Regulatory type code selected on the SureTax Sales Setup page and customer page transactions for this item.
- SureTax Tax Situs Rule Your selection will override the default Tax Situs Rule selected on the SureTax Sales Setup page and customer page on transactions for this item.
- SureTax Disable Your selection will override the default SureTax Enable selected on the SureTax Sales Setup page on transactions for this item.
- Close the Item page to save your changes.
Configuring Settings for G/L Accounts
CCH SureTax settings are added to the Dynamics 365 Business Central G/L Account page. Use the following procedure to set the CCH SureTax transaction type code for a specific Dynamics 365 Business Central G/L account.
- Open the G/L account that you are modifying settings for.
- Expand the CCH SureTax tab.
- Select options for each of the following fields:
- SureTax Transaction Type Code. Your selection will override the default Transaction type code selected on the SureTax Sales Setup page on transactions for this G/L account.
- SureTax Regulatory Type Code Your selection will override the default Regulatory type code selected on the SureTax Sales Setup page and customer page transactions for this G/L account.
- SureTax Tax Situs Rule Your selection will override the default Tax Situs Rule selected on the SureTax Sales Setup page and customer page on transactions for this G/L account.
- SureTax Disable Your selection will override the default SureTax Enable selected on the SureTax Sales Setup page on transactions for this G/L account.
- Close the G/L Account page to save your changes.
Configuring Settings for Resources
CCH SureTax settings are added to the Dynamics 365 Business Central Resources page. Use the following procedure to set the CCH SureTax transaction type code for a specific Dynamics 365 Business Central Resource.
- Open the Resource that you are modifying settings for.
- Expand the CCH SureTax tab.
- Select options for each of the following fields:
- SureTax Transaction Type Code. Your selection will override the default Transaction type code selected on the SureTax Sales Setup page on transactions for this Resource.
- SureTax Regulatory Type Code Your selection will override the default Regulatory type code selected on the SureTax Sales Setup page and customer page transactions for this resource.
- SureTax Tax Situs Rule Your selection will override the default Tax Situs Rule selected on the SureTax Sales Setup page and customer page on transactions for this resource.
- SureTax Disable Your selection will override the default SureTax Enable selected on the SureTax Sales Setup page on transactions for this resource.
- Close the Resource page to save your changes.
Configuring Settings for Fixed Assets
CCH SureTax settings are added to the Dynamics 365 Business Central Fixed Assets page. Use the following procedure to set the CCH SureTax transaction type code for a specific Dynamics 365 Business Central Fixed Asset.
- Open the Fixed Asset that you are modifying settings for.
- Expand the CCH SureTax tab.
- Select options for each of the following fields:
- SureTax Transaction Type Code. Your selection will override the default Transaction type code selected on the SureTax Sales Setup page on transactions for this Fixed Asset.
- SureTax Regulatory Type Code Your selection will override the default Regulatory type code selected on the SureTax Sales Setup page and customer page transactions for this Fixed Asset.
- SureTax Tax Situs Rule Your selection will override the default Tax Situs Rule selected on the SureTax Sales Setup page and customer page on transactions for this Fixed Asset.
- SureTax Disable Your selection will override the default SureTax Enable selected on the SureTax Sales Setup page on transactions for this Fixed Asset.
- Close the Fixed Asset page to save your changes.
Configuring Settings for Item Charges
CCH SureTax settings are added to Dynamics 365 Business Central Item Charges. Use the following procedure to set the CCH SureTax transaction type code for specific Dynamics 365 Business Central Item charge.
- Select the Item Charge that you are modifying settings for.
- Select options for each of the following fields:
- SureTax Transaction Type Code. Your selection will override the default Transaction type code selected on the SureTax Sales Setup page on transactions for this Item Charge.
- SureTax Regulatory Type Code Your selection will override the default Regulatory type code selected on the SureTax Sales Setup page and customer page transactions for this item charge.
- SureTax Tax Situs Rule Your selection will override the default Tax Situs Rule selected on the SureTax Sales Setup page and customer page on transactions for this item charge.
- SureTax Disable Your selection will override the default SureTax Enable selected on the SureTax Sales Setup page on transactions for this item charge.
- Close the Item Charge page to save your changes.
Configuring Settings for Item Categories
CCH SureTax settings are added to Dynamics 365 Business Central Item Categories. Use the following procedure to set the CCH SureTax transaction type code for specific Dynamics 365 Business Central Item categories.
- Select the Item Category that you are modifying settings for.
- Select options for each of the following fields:
- SureTax Transaction Type Code. Your selection will override the default Transaction type code selected on the SureTax Sales Setup page on transactions for this Item Category. If a transaction type code is assigned to both an item and the item category for that item, then the transaction type code for the item is used.
- Close the Item Category page to save your changes.
Configuring Settings for Resource Groups
CCH SureTax settings are added to Dynamics 365 Business Central Resource Groups. Use the following procedure to set the CCH SureTax transaction type code for specific Dynamics 365 Business Central Resource groups.
- Select the Resource Group that you are modifying settings for.
- Select options for each of the following fields:
- SureTax Transaction Type Code. Your selection will override the default Transaction type code selected on the SureTax Sales Setup page on transactions for this Item Category. If a transaction type code is assigned to both a resource and the resource group for that resource, then the transaction type code for the resource is used.
- Close the Resource Group page to save your changes.
Setting SureTax Options for Jobs
SureTax settings are added to Dynamics 365 Business Central jobs. Use the following procedure to set the SureTax tax included code for specific Dynamics 365 Business Central jobs:
- Select the Job that you are modifying settings for.
- Select options for SureTax Tax Included Code. Your selection will override the default tax included code selected on the customer page for lines that contain this job.
- Close the Job page to save your changes.
Setting SureTax Options for Shipment Methods
SureTax settings are added to Dynamics 365 Business Central shipment methods. Use the following procedure to set the SureTax freight on board for specific Dynamics 365 Business Central shipment methods:
- Select the Shipment Method that you are modifying settings for.
- Select options for SureTax Tax Freight on Board. Your selection will be used for the default freight on board on sales lines where the sales header contains this shipment method.
- Close the Shipment Method page to save your changes.
Using the CCH SureTax Features on Individual Sales Documents
When you create a sales document, the system applies the CCH SureTax settings that are selected on the page of the item type, customer, and SureTax Sales Setup page to the new document.
CCH SureTax Settings for Sales Transaction Header
The SureTax plugin allows you to override SureTax settings at the header level on Sales transactions. Do the following to configure SureTax Header settings on a Sales transaction:
- Create a sales order or open an existing one.
- Select the Related-->Order.
- From the dropdown, Select SureTax Settings.
- Suretax settings should default from customer or SureTax Sales setup form.
- User can configure the desired CCH SureTax settings for the header.
- Header Suretax settings get defaulted to transaction lines automatically.
CCH SureTax Settings for Sales Transaction Lines
The SureTax plugin allows you to override SureTax settings at the line level on Sales transactions. Do the following to configure SureTax settings for individual lines on a Sales transaction:
- Select the transaction line for which to configure SureTax settings.
- Select the Line dropdown on the line items grid.
- Select SureTax Settings.
- Configure the desired CCH SureTax settings for the line.
The SureTax plugin also allows you to configure SureTax settings for multiple lines at once. To configure SureTax settings for multiple lines on a Sales transaction, do the following:
- Select the lines for which to configure SureTax settings.
- Select the Line dropdown on the line items grid.
- Select CCH Upd. Selected Lines Settings.
- Configure the desired CCH SureTax settings for the selected lines.
- Select OK to save your changes.
The SureTax settings for sales lines may be alternatively initialized or updated in the following cases:
- Copy Document. When lines from a document are copied using the copy document function, the SureTax line settings are copied to the newly created lines.
- Note: If the option Recalculate SureTax Settings on Copy on the SureTax Company Setup page is selected and Recalculate Lines is selected during copy, then the SureTax line settings will not be copied and instead will be initialized as normal.
- Make Order/Invoice. When Make Order or Make Invoice is selected on a sales quote, the SureTax line settings are copied from the quote to the newly created order or invoice.
- Get Posted Document Lines to Reverse/Create Corrective Credit Memo. When reversing lines are created on a return order or credit memo, the SureTax line settings are copied to the newly created lines.
- Field Changes. When the following fields are modified on a sales document, the SureTax line settings that correspond to the fields are updated:
- Customer
- Ship-to Code
- Item Number
- Job
- Shipment Method
Enabling or Disabling SureTax in Sales Transactions line level
The SureTax plugin allows you to enable or disable SureTax at the line level on Sales transactions. Do the following to enable or disable SureTax for individual lines on a Sales transaction:
- SureTax Disabled column is made available and can be added to the Sales document line grid.
- SureTax Disabled column is not displayed by default and must be added to the Sales document line grid if needed.
- Select the transaction line for which to enable or disable SureTax.
- Select the SureTax Disabled checkbox to disable SureTax for the line.
- Tax is not calculated for lines where SureTax is disabled.
Viewing Sales Tax Details for Sales Documents
The CCH SureTax Tax Results page allows you to view detailed information about the sales tax for a document. To access this page, do the following:
- Open the sales document for which you want to display tax details.
- Select Sales Tax Results. The SureTax Results page opens. This page shows tax information sent to and returned from SureTax at an order, line, and detail level. The information on this page cannot be edited.
- Note: Dimension Code and Dimension Value from CCH Company Setup > Multiple Entity Setup needs to be added in transactions if multiple SureTax clients are configured.
- Do the following as needed to view tax details for a specific item:
- Details for specific line items are displayed in the Line Information grid. Scroll to the left or right as necessary to view line information details.
- To view tax details for a line item, select the line item and select Manage > Tax Details. The CCH Tax Details page will open and display detailed tax information for the line.
- To view error messages for a line item, select the line item and select Manage > Messages. The CCH Tax Results Messages page will open and display any error messages for the line.
- Select Actions > View JSON to view the JSON of the CCH SureTax Request.
- Select Actions > Show Adjustment to view tax results for any sales tax adjustment entered on the statistics page.
Calculating Tax for a Sales Document
Sales tax is calculated for a sale any time you perform one of the following tasks:
- Open the Dynamics 365 Business Central Statistics window for a sales document
- Open the CCH SureTax Tax Results window for a sales document
- Print a sales document
- Release a sales document
- Post an order, invoice, return order, or credit memo
- Note: If automatic tax calculation is enabled, tax will also be calculated whenever Dynamics 365 Business Central would typically calculate tax, such as when a line item quantity or amount is modified.
Posting a Sales Document
When you post a sales order, return order, credit memo, or invoice, the plug-in finalizes the CCH SureTax transaction for the document.
- Note: Tax adjustments entered on the statistics page will only be finalized if they increase tax liability.
Configuring and Using the Purchasing Component
Overview
The Purchasing component of the CCH SureTax for Microsoft Dynamics 365 Business Central plug-in integrates with the Dynamics 365 Business Central Purchasing module. The Dynamics 365 Business Central Purchasing pages for which CCH SureTax can calculate tax are as follows:
- Purchase Quotes
- Purchase Orders
- Blanket Purchase Orders
- Purchase Return Orders
- Purchase Invoices
- Purchase Credit Memos
The first half of this chapter explains how to configure the options that impact the Purchasing component. The setup process includes setting defaults on some standard Dynamics 365 Business Central pages.
The second half of the chapter, titled Using the Purchasing Component, includes information about using CCH SureTax options when entering transactions into Microsoft Dynamics 365 Business Central. This section also describes how to view use taxes prior to posting and how to post the use tax transactions.
Configuring Purchasing Settings for a Company
The SureTax Purchasing Setup page allows you to configure CCH SureTax settings for the company that apply to the purchasing module.
To configure purchasing settings, do the following:
- Search for and select the SureTax Purchasing Setup page.
- Select the General tab and configure the following settings:
- Enable SureTax. Enables the plug-in to calculate tax in the purchasing module.
- Disable Automatic Tax Calculation. Selecting this will reduce the number of tax calculation calls made to SureTax. Tax calculation will only be performed when explicitly called for.
- SKU Option. Select whether to send the transaction type code or SKU to identify items.
- Apply Use Tax Adjustment. Select whether a use tax adjustment should be sent to SureTax when a tax adjustment reduces the amount of tax charged by the vendor.
- Select the Defaults tab and configure the following settings:
- Default Regulatory Code. Enter the default regulatory code to be used on purchasing transactions.
- Default Sales Type Code. Enter the default sales type code to be used on purchasing transactions.
- Default Tax Situs Rule. Enter the default tax situs rule to be used on purchasing transactions.
- Default Transaction Type Code. Enter the default transaction type code to be used on purchasing transactions.
- Default Tax Exemption Code. Enter the default tax exemption code to be used on purchasing transactions.
Configuring Data Exchange for Purchases
The SureTax Purchase Data Exchange Setup page allows you to configure which fields are sent from Business Central to SureTax for purchase documents. To configure data exchange for purchases, do the following:
- Search for and select the SureTax Purchase Data Exchange Setup page.
- Select the purchase document type.
- Select the data exchange field that specifies which SureTax API field the data will be sent.
- Select either a Business Central table and field name to send data from a specific field or enter static text to send a text value.
Configuring Settings for a Vendor
CCH SureTax settings are added to the Dynamics 365 Business Central Vendor page. Use the following procedure to override the CCH SureTax purchasing type code for specific Dynamics 365 Business Central vendor accounts.
- Open the vendor page for the vendor that you are modifying settings for.
- Expand the CCH SureTax tab.
- In the SureTax section, select options for the following field:
- SureTax Sales Type Code. Your selection will override the default Purchasing type code selected on the SureTax Purchasing Setup page on transactions for this vendor.
- SureTax Exemption Code. Your selection will override the default exemption code selected on the SureTax Purchasing Setup page on transactions for this vendor.
- SureTax Exempt Reason Code. Your selection will override the default exempt reason code selected on the SureTax Purchasing Setup page on transactions for this vendor.
- Apply Use Tax Adjustment. If selected, your selection will override the default option for applying use tax adjustments on the SureTax Purchasing Setup page on transactions for this vendor.
- Close the vendor page to save your changes.
Configuring Settings for Items
CCH SureTax settings are added to the Dynamics 365 Business Central items page. Use the following procedure to set the CCH SureTax transaction type code for specific Dynamics 365 Business Central items.
- Open the Item page for the item that you are modifying settings for.
- Expand the CCH SureTax tab.
- Select options for each of the following fields:
- SureTax Transaction Type Code. Your selection will override the default Transaction type code selected on the SureTax Purchasing Setup page on transactions for this item.
- SureTax Regulatory Type Code Your selection will override the default Regulatory type code selected on the SureTax Purchasing Setup page transactions for this item .
- SureTax Tax Situs Rule Your selection will override the default Tax Situs Rule selected on the SureTax Purchasing Setup page on transactions for this item .
- SureTax Disable Your selection will override the default SureTax Enable selected on the SureTax Purchasing Setup page on transactions for this item .
- Close the Item page to save your changes.
Configuring Settings for G/L Accounts
CCH SureTax settings are added to the Dynamics 365 Business Central G/L Account page. Use the following procedure to set the CCH SureTax transaction type code for a specific Dynamics 365 Business Central G/L account.
- Open the G/L account that you are modifying settings for.
- Expand the CCH SureTax tab.
- Select options for each of the following fields:
- SureTax Transaction Type Code. Your selection will override the default Transaction type code selected on the SureTax Purchasing Setup page on transactions for this G/L account.
- SureTax Regulatory Type Code Your selection will override the default Regulatory type code selected on the SureTax Purchasing Setup page transactions for this G/L account.
- SureTax Tax Situs Rule Your selection will override the default Tax Situs Rule selected on the SureTax Purchasing Setup page on transactions for this G/L account.
- SureTax Disable Your selection will override the default SureTax Enable selected on the SureTax Purchasing Setup page on transactions for this G/L account.
- Close the G/L Account page to save your changes.
Configuring Settings for Fixed Assets
CCH SureTax settings are added to the Dynamics 365 Business Central Fixed Assets page. Use the following procedure to set the CCH SureTax transaction type code for a specific Dynamics 365 Business Central Fixed Asset.
- Open the Fixed Asset that you are modifying settings for.
- Expand the CCH SureTax tab.
- Select options for each of the following fields:
- SureTax Transaction Type Code. Your selection will override the default Transaction type code selected on the SureTax Purchasing Setup page on transactions for this Fixed Asset.
- SureTax Regulatory Type Code Your selection will override the default Regulatory type code selected on the SureTax Purchasing Setup page transactions for this Fixed Asset.
- SureTax Tax Situs Rule Your selection will override the default Tax Situs Rule selected on the SureTax Purchasing Setup page on transactions for this Fixed Asset.
- SureTax Disable Your selection will override the default SureTax Enable selected on the SureTax Purchasing Setup page on transactions for this Fixed Asset.
- Close the Fixed Asset page to save your changes.
Configuring Settings for Item Charges
CCH SureTax settings are added to Dynamics 365 Business Central Item Charges. Use the following procedure to set the CCH SureTax transaction type code for specific Dynamics 365 Business Central Item charge.
- Select the Item Charge that you are modifying settings for.
- Select options for each of the following fields:
- SureTax Transaction Type Code. Your selection will override the default Transaction type code selected on the SureTax Purchasing Setup page on transactions for this Item Charge.
- SureTax Regulatory Type Code Your selection will override the default Regulatory type code selected on the SureTax Purchasing Setup page transactions for this item charge.
- SureTax Tax Situs Rule Your selection will override the default Tax Situs Rule selected on the SureTax Purchasing Setup page on transactions for this item charge.
- SureTax Disable Your selection will override the default SureTax Enable selected on the SureTax Purchasing Setup page on transactions for this item charge.
- Close the Item Charge page to save your changes.
Configuring Settings for Item Category
CCH SureTax settings are added to Dynamics 365 Business Central Item Categories. Use the following procedure to set the CCH SureTax transaction type code for a specific Dynamics 365 Business Central Item category.
- Select the Item Category that you are modifying settings for.
- Select options for each of the following fields:
- SureTax Transaction Type Code. Your selection will override the default Transaction type code selected on the SureTax Purchasing Setup page on transactions for this Item Category.
- Item Category. If a transaction type code is assigned to both an item and the item category for that item, then the transaction type code for the item is used.
- Close the Item Cateogry page to save your changes.
Using the CCH SureTax Features on Individual Purchasing Documents
When you create a purchasing document, the system applies the CCH SureTax settings that are selected on the page of the item type, vendor, and SureTax Purchasing Setup page to the new document.
CCH SureTax Settings for Purchase Transaction Header
The SureTax plugin allows you to override SureTax settings at the header level on Purchase transactions. Do the following to configure SureTax Header settings on a Purchase transaction:
- Create a Purchase order or open an existing one.
- Select the Related-->Order.
- From the dropdown, Select SureTax Settings.
- Suretax settings should default from customer or SureTax Purchase setup form.
- User can configure the desired CCH SureTax settings for the header.
- Header Suretax settings get defaulted to transaction lines automatically.
CCH SureTax Settings for Purchasing Transaction Lines
The SureTax plugin allows you to override CCH SureTax settings at the line level on Purchasing transactions. Do the following to configure CCH SureTax settings for individual lines on a Purchasing transaction.
- Select the transaction line for which to configure CCH SureTax settings.
- Select the Line dropdown on the line items grid.
- Select SureTax Settings.
- Configure the desired CCH SureTax settings for the line.
The SureTax plugin also allows you to configure SureTax settings for multiple lines at once. To configure SureTax settings for multiple lines on a Purchase transaction, do the following:
- Select the lines for which to configure SureTax settings.
- Select the Line dropdown on the line items grid.
- Select CCH Upd. Selected Lines Settings.
- Configure the desired CCH SureTax settings for the selected lines.
- Select OK to save your changes.
The SureTax settings for purchasing lines may be alternatively initialized or updated in the following cases:
- Copy Document. When lines from a document are copied using the copy document function, the SureTax line settings are copied to the newly created lines.
- Note: If the option Recalculate SureTax Settings on Copy on the SureTax Company Setup page is selected and Recalculate Lines is selected during copy, then the SureTax line settings will not be copied and instead will be initialized as normal.
- Make Order/Invoice. When Make Order is selected on a purchase quote, the SureTax line settings are copied from the quote to the newly created order.
- Get Posted Document Lines to Reverse/Create Corrective Credit Memo. When reversing lines are created on a return order or credit memo, the SureTax line settings are copied to the newly created lines.
- Field Changes. When the following fields are modified on a purchasing document, the SureTax line settings that correspond to Item Number are updated.
Enabling or Disabling SureTax in Purchasing Transactions
The SureTax plugin allows you to enable or disable SureTax at the line level on Purchasing transactions. Do the following to enable or disable SureTax for individual lines on a Purchasing transaction:
- SureTax Disabled column is made available and can be added to the Purchasing document line grid.
- SureTax Disabled column is not displayed by default and must be added to the Purchasing document line grid.
- Select the transaction line for which to enable or disable SureTax.
- Select the SureTax Disabled checkbox to disable SureTax for the line.
- Tax is not calculated for lines where SureTax is disabled.
Viewing Use Tax Details for Purchasing Documents
The CCH SureTax Tax Results page allows you to view detailed information about the use tax for a document. To access this page, do the following:
- Open the purchasing document for which you want to display tax details.
- Select Use Tax Results. The CCH SureTax Tax Results page opens. This page shows tax information sent to and returned from CCH SureTax at an order, line, and detail level. The information on this page cannot be edited.
- Note: Dimension Code and Dimension Value from CCH Company Setup > Multiple Entity Setup needs to be added in transactions if multiple SureTax clients are configured.
- Do the following as needed to view tax details for a specific item:
- Details for specific line items are displayed in the Line Information grid. Scroll to the left or right as necessary to view line information details.
- To view tax details for a line item, select the line item and select Manage > Tax Details. The CCH Tax Details page will open and display detailed tax information for the line.
- To view error messages for a line item, select the line item and select Manage > Messages. The CCH Tax Results Messages page will open and display any error messages for the line.
- Select Actions > View JSON to view the JSON of the CCH SureTax Request.
- Select Actions > Show Adjustment to view tax results for any tax adjustment entered on the statistics page.
Calculating Tax for a Purchasing Document
Use tax is calculated for a purchase any time you perform one of the following tasks:
- Open the Dynamics 365 Business Central Statistics window for a purchasing document
- Open the CCH SureTax Tax Results window for a purchasing document
- Print a purchasing document
- Release a purchasing document
- Post an order, invoice, return order, or credit memo
- Note: If automatic tax calculation is enabled, tax will also be calculated whenever Dynamics 365 Business Central would typically calculate tax, such as when a line item quantity or amount is modified. If "Use Tax" is selected for the line, the SureTax setting "Tax Included Code" is ignored.
Posting a Purchasing Document
When you post a purchasing order, return order, credit memo, or invoice, the plug-in finalizes the transaction for the document.
- Notes:
- SureTax will only accrue tax liability for purchase lines where the Use Tax field is checked.
- Tax adjustments entered on the statistics page will only be finalized if they increase tax liability.
Configuring and Using the Services Component
Overview
The Services component of the CCH SureTax for Microsoft Dynamics 365 Business Central plug-in integrates with the Dynamics 365 Business Central Services module. The Dynamics 365 Business Central Services pages for which CCH SureTax can calculate tax are as follows:
- Service Quotes
- Service Orders
- Service Invoices
- Service Credit Memos
The first half of this chapter explains how to configure the options that impact the Services component. The setup process includes setting defaults on some standard Dynamics 365 Business Central pages.
The second half of the chapter, titled Using the Services Component, includes information about using CCH SureTax options when entering transactions into Microsoft Dynamics 365 Business Central. This section also describes how to view service taxes prior to posting and how to post the service tax transactions.
Configuring the Services Component
Configuring Service Settings for a Company
The SureTax Service Setup page allows you to configure CCH SureTax settings for the company that apply to the service module.
To configure service settings, do the following:
- Search for and select the SureTax Service Setup page.
- Select the General tab and configure the following settings:
- Enable SureTax. Enables the plug-in to calculate tax in the service module.
- Disable Automatic Tax Calculation. Selecting this will reduce the number of tax calculation calls made to SureTax. Tax calculation will only be performed when explicitly called for.
- SKU Option. Select whether to send the transaction type code or SKU to identify items.
- Exempt Code Type. Determines Sell-to Customer No. or Bill-to Customer No. gets sent to SureTax for exemption processing. Options are:
- Sell-to Customer.
- Bill-to Customer.
- Select the Defaults tab and configure the following settings:
- Default Regulatory Code. Enter the default regulatory code to be used on service transactions.
- Default Sales Type Code. Enter the default sales type code to be used on service transactions.
- Default Tax Situs Rule. Enter the default tax situs rule to be used on service transactions.
- Default Transaction Type Code. Enter the default transaction type code to be used on service transactions.
- Default Tax Exemption Code. Enter the default tax exemption code to be used on service transactions.
- Default Exempt Reason Code. Enter the default exempt reason code to be used on service transactions.
Configuring Data Exchange for Service
The SureTax Service Data Exchange Setup page allows you to configure which fields are sent from Business Central to SureTax for service documents. To configure data exchange for service, do the following:
- Search for and select the SureTax Service Data Exchange Setup page.
- Select the service document type.
- Select the data exchange field that specifies which SureTax API field the data will be sent.
- Select either a Business Central table and field name to send data from a specific field or enter static text to send a text value.
Configuring Settings for a Customer
CCH SureTax settings are added to the Dynamics 365 Business Central Customer page. Use the following procedure to override the CCH SureTax sales type code for specific Dynamics 365 Business Central customer accounts.
- Open the customer page for the customer that you are modifying settings for.
- Expand the CCH SureTax tab.
- In the SureTax section, select options for the following field:
- SureTax Sales Type Code. Your selection will override the default Sales type code selected on the SureTax Service Setup page on transactions for this customer.
- SureTax Regulatory Type Code Your selection will override the default Regulatory type code selected on the SureTax Service Setup page on transactions for this customer.
- SureTax Exemption Code. Your selection will override the default exemption code selected on the SureTax Service Setup page on transactions for this customer.
- SureTax Exempt Reason Code. Your selection will override the default exempt reason code selected on the SureTax Service Setup page on transactions for this customer.
- SureTax Tax Included Code. Your selection will act as the default tax included code on transactions for this customer.
- Close the Customer page to save your changes.
Configuring Settings for Customer Ship-to Addresses
CCH SureTax settings are added to Dynamics 365 Business Central Customer Ship-to Addresses. Use the following procedure to set the CCH SureTax transaction type code for specific Dynamics 365 Business Central Item charge.
- Select the Customer Ship-to Address that you are modifying settings for.
- Select options for each of the following fields:
- SureTax Exemption Code.This exemption code will override any exemption code selected for the customer when the ship-to code is specified on a transaction.
- SureTax Exempt Reason Code. This exempt reason code will override any exempt reason code selected for the customer when the ship-to code is specified on a transaction.
- Close the Customer Ship-to Address page to save your changes.
Configuring Settings for Items
CCH SureTax settings are added to the Dynamics 365 Business Central items page. Use the following procedure to set the CCH SureTax transaction type code for specific Dynamics 365 Business Central items.
- Open the Item page for the item that you are modifying settings for.
- Expand the CCH SureTax tab.
- Select options for each of the following fields:
- SureTax Transaction Type Code: Your selection will override the default Transaction type code selected on the SureTax Service Setup page on transactions for this item.
- SureTax Regulatory Type Code: Your selection will override the default Regulatory type code selected on the SureTax Service Setup page and customer page transactions for this item.
- SureTax Tax Situs Rule: Your selection will override the default Tax Situs Rule selected on the SureTax Service Setup page and customer page on transactions for this item.
- SureTax Disable: Your selection will override the default SureTax Enable selected on the SureTax Service Setup page on transactions for this item.
- Close the Item page to save your changes.
Configuring Settings for G/L Accounts
CCH SureTax settings are added to the Dynamics 365 Business Central G/L Account page. Use the following procedure to set the CCH SureTax transaction type code for a specific Dynamics 365 Business Central G/L account.
- Open the G/L account that you are modifying settings for.
- Expand the CCH SureTax tab.
- Select options for each of the following fields:
- SureTax Transaction Type Code: Your selection will override the default Transaction type code selected on the SureTax Service Setup page on transactions for this G/L account.
- SureTax Regulatory Type Code: Your selection will override the default Regulatory type code selected on the SureTax Service Setup page and customer page transactions for this G/L account.
- SureTax Tax Situs Rule: Your selection will override the default Tax Situs Rule selected on the SureTax Service Setup page and customer page on transactions for this G/L account.
- SureTax Disable: Your selection will override the default SureTax Enable selected on the SureTax Service Setup page on transactions for this G/L account.
- Close the G/L Account page to save your changes.
Configuring Settings for Resources
CCH SureTax settings are added to the Dynamics 365 Business Central Resources page. Use the following procedure to set the CCH SureTax transaction type code for a specific Dynamics 365 Business Central Resource.
- Open the Resource that you are modifying settings for.
- Expand the CCH SureTax tab.
- Select options for each of the following fields:
- SureTax Transaction Type Code: Your selection will override the default Transaction type code selected on the SureTax Service Setup page on transactions for this Resource.
- SureTax Regulatory Type Code: Your selection will override the default Regulatory type code selected on the SureTax Service Setup page and customer page transactions for this Resource.
- SureTax Tax Situs Rule: Your selection will override the default Tax Situs Rule selected on the SureTax Service Setup page and customer page on transactions for this Resource.
- SureTax Disable: Your selection will override the default SureTax Enable selected on the SureTax Sales Service page on transactions for this Resource.
- Close the Resource page to save your changes.
Configuring Settings for Cost
CCH SureTax settings are added to Dynamics 365 Business Central Cost. Use the following procedure to set the CCH SureTax transaction type code for a specific Dynamics 365 Business Central Cost.
- Select the Cost that you are modifying settings for.
- Select options for each of the following fields:
- SureTax Transaction Type Code: Your selection will override the default Transaction type code selected on the SureTax Service Setup page on transactions for this Cost.
- SureTax Regulatory Type Code: Your selection will override the default Regulatory type code selected on the SureTax Service Setup page and customer page transactions for this Cost.
- SureTax Tax Situs Rule: Your selection will override the default Tax Situs Rule selected on the SureTax Service Setup page and customer page on transactions for this Cost.
- SureTax Disable: Your selection will override the default SureTax Enable selected on the SureTax Service Setup page on transactions for this Cost.
- Close the Cost page to save your changes.
Configuring Settings for Item Categories
CCH SureTax settings are added to Dynamics 365 Business Central Item Categories. Use the following procedure to set the CCH SureTax transaction type code for specific Dynamics 365 Business Central Item categories.
- Select the Item Category that you are modifying settings for.
- Select options for each of the following fields:
- SureTax Transaction Type Code. Your selection will override the default Transaction type code selected on the SureTax Service Setup page on transactions for this Item Category. If a transaction type code is assigned to both an item and the item category for that item, then the transaction type code for the item is used.
- Close the Item Category page to save your changes.
Configuring Settings for Resource Groups
CCH SureTax settings are added to Dynamics 365 Business Central Resource Groups. Use the following procedure to set the CCH SureTax transaction type code for specific Dynamics 365 Business Central Resource groups.
- Select the Resource Group that you are modifying settings for.
- Select options for each of the following fields:
- SureTax Transaction Type Code. Your selection will override the default Transaction type code selected on the SureTax Service Setup page on transactions for this Item Category. If a transaction type code is assigned to both a resource and the resource group for that resource, then the transaction type code for the resource is used.
- Close the Resource Group page to save your changes.
Using the CCH SureTax Features on Individual Service Documents
When you create a service document, the system applies the SureTax settings that are selected on the page of the item type, customer, and SureTax Service Setup page to the new document.
CCH SureTax Settings for Service Transaction Header
The SureTax plugin allows you to override SureTax settings at the header level on Service transactions. Do the following to configure SureTax Header settings on a Service transaction:
- Create a Service order or open an existing one.
- Select the Related-->Order.
- From the dropdown, Select SureTax Settings.
- Suretax settings should default from customer or SureTax Service setup form.
- User can configure the desired CCH SureTax settings for the header.
- Header Suretax settings get defaulted to transaction lines automatically.
CCH SureTax Settings for Service Transaction Lines
The SureTax plugin allows you to override SureTax settings at the line level on Service transactions. Do the following to configure SureTax settings for individual lines on a Service transaction.
- Select the transaction line for which to configure SureTax settings.
- Select the Line dropdown on the line items grid.
- Select SureTax Settings.
- Configure the desired SureTax settings for the line.
The SureTax plugin also allows you to configure SureTax settings for multiple lines at once. To configure SureTax settings for multiple lines on a Service transaction, do the following:
- Select the lines for which to configure SureTax settings.
- Select the Line dropdown on the line items grid.
- Select CCH Upd. Selected Lines Settings.
- Configure the desired SureTax settings for the selected lines.
- Select OK to save your changes.
The SureTax settings for service lines may be alternatively initialized or updated in the case of Field Changes. When the following fields are modified on a sales document, the SureTax line settings that correspond to the fields are updated:
- Customer
- Ship-to Code
- Item Number
Enabling or Disabling SureTax in Service Transactions
The SureTax plugin allows you to enable or disable SureTax at the line level on Service transactions. Do the following to enable or disable SureTax for individual lines on a Service transaction:
- SureTax Disabled column is made available and can be added to the Service document line grid.
- SureTax Disabled column is not displayed by default and must be added to the Service document line grid.
- Select the transaction line for which to enable or disable SureTax.
- Select the SureTax Disabled checkbox to disable SureTax for the line.
- Tax is not calculated for lines where SureTax is disabled.
Viewing Service Tax Details for Service Documents
The SureTax Tax Results page allows you to view detailed information about the service tax for a document. To access this page, do the following:
- Open the service document for which you want to display tax details.
- Select Service Tax Results. The SureTax Tax Results page opens. This page shows tax information sent to and returned from SureTax at an order, line, and detail level. The information on this page cannot be edited.
- Note: Dimension Code and Dimension Value from CCH Company Setup > Multiple Entity Setup needs to be added in transactions if multiple SureTax clients are configured.
- Do the following as needed to view tax details for a specific item:
- Details for specific line items are displayed in the Line Information grid. Scroll to the left or right as necessary to view line information details.
- To view tax details for a line item, select the line item and select Manage > Tax Details. The CCH Tax Details page will open and display detailed tax information for the line.
- To view error messages for a line item, select the line item and select Manage > Messages. The CCH Tax Results Messages page will open and display any error messages for the line.
- Select Actions > View JSON in order to view the JSON of the SureTax Request.
Calculating Tax for a Service Document
Service tax is calculated for a service any time you perform one of the following tasks:
- Open the Dynamics Dynamics 365 Business Central Statistics window for a service document
- Open the SureTax Tax Results window for a service document
- Print a service document
- Release a service document
- Post an order, invoice, return order, or credit memo
- Note: If automatic tax calculation is enabled, tax will also be calculated whenever Dynamics 365 Business Central would typically calculate tax, such as when a line item quantity or amount is modified.
Posting a Service Document
When you post a service order, return order, credit memo, or invoice, the plug-in finalizes the SureTax transaction for the document.
Technical and Extension Information
SureTax API
The plug-in provides a tax calculation API to facilitate integration of SureTax tax calculation with custom pages and procedures.
Codeunit "CCH Calculate Tax Events-Sales"
CalculateAndUpdate(var SalesHeader: Record "Sales Header"; updateLines: Boolean) - Calculates tax for the given sales document and optionally updates the line taxes in BC.
Codeunit "CCH Calculate Tax Events-Purch"
CalculateAndUpdate(var PurchHeader: Record "Purchase Header"; updateLines: Boolean) - Calculates tax for the given purchase document and optionally updates the line taxes in BC.
Codeunit "CCH Calculate Tax Events-Serv"
CalculateAndUpdate(var ServiceHeader: Record "Service Header"; updateLines: Boolean) - Calculates tax for the given service document and optionally updates the line taxes in BC.
Published Events
The plug-in provides a set of published events that aid in creating extensions that can easily override data being sent to SureTax and override how that data is written back in BC.
Note that if data being sent to SureTax is to be overridden, it will require three event subscribers in order to override data being sent for open orders, invoices, and credit memos. For instance, if the:
OnAfterCopyFieldsFromSalesHeader() event is used to override request header data for sales documents, the OnAfterCopyFieldsFromSalesInvoiceHeader() and OnAfterCopyFIeldsFromSalesCrMemoHeader() events should also be used to override the same values when a sales document is posted.
Table "CCH Request Header"
OnAfterCopyFieldsFromSalesHeader(var CCHRequestHeader: Record "CCH Request Header", var SalesHeader: Record "Sales Header) - Event after the request header has been initialized from the sales header record.
OnAfterCopyFieldsFromSalesInvoiceHeader(var CCHRequestHeader: Record "CCH Request Header", var SalesInvoiceHeader: Record "Sales Invoice Header) - Event after the request header has been initialized from the sales invoice header record.
OnAfterCopyFieldsFromSalesCrMemoHeader(var CCHRequestHeader: Record "CCH Request Header", var SalesCrMemoHeader: Record "Sales Cr.Memo Header) - Event after the request header has been initialized from the sales credit memo header record.
OnAfterCopyFieldsFromPurchaseHeader(var CCHRequestHeader: Record "CCH Request Header", var PurchaseHeader: Record "Purchase Header) - Event after the request header has been initialized from the purchase header record.
OnAfterCopyFieldsFromPurchaseInvoiceHeader(var CCHRequestHeader: Record "CCH Request Header", var PurchaseInvoiceHeader: Record "Purch. Inv. Header) - Event after the request header has been initialized from the purchase invoice header record.
OnAfterCopyFieldsFromPurchaseCrMemoHeader(var CCHRequestHeader: Record "CCH Request Header", var PurchaseCrMemoHeader: Record "Purch. Cr. Memo Hdr) - Event after the request header has been initialized from the purchase credit memo header record.
OnAfterCopyFieldsFromServiceHeader(var CCHRequestHeader: Record "CCH Request Header", var ServiceHeader: Record "Service Header) - Event after the request header has been initialized from the service header record.
OnAfterCopyFieldsFromServiceInvoiceHeader(var CCHRequestHeader: Record "CCH Request Header", var ServiceInvoiceHeader: Record "Service Invoice Header) - Event after the request header has been initialized from the service invoice header record.
OnAfterCopyFieldsFromServiceCrMemoHeader(var CCHRequestHeader: Record "CCH Request Header", var ServiceCrMemoHeader: Record "Service Cr.Memo Header) - Event after the request header has been initialized from the service credit memo header record.
Table "CCH Request Line"
OnAfterCopyFieldsFromSalesHeader(var CCHRequestLine: Record "CCH Request Line"; var SalesHeader: Record "Sales Header) - Event after the request line has been initialized from the sales header record.
OnAfterCopyFieldsFromSalesInvoiceHeader(var CCHRequestLine: Record "CCH Request Line"; var SalesInvoiceHeader: Record "Sales Invoice Header) - Event after the request line has been initialized from the sales invoice header record.
OnAfterCopyFieldsFromSalesCrMemoHeader(var CCHRequestLine: Record "CCH Request Line"; var SalesCrMemoHeader: Record "Sales Cr.Memo Header) - Event after the request line has been initialized from the sales credit memo header record.
OnAfterCopyFieldsFromPurchaseHeader(var CCHRequestLine: Record "CCH Request Line"; var PurchaseHeader: Record "Purchase Header) - Event after the request line has been initialized from the purchase header record.
OnAfterCopyFieldsFromPurchaseInvoiceHeader(var CCHRequestLine: Record "CCH Request Line"; var PurchaseInvoiceHeader: Record "Purch. Inv. Header) - Event after the request line has been initialized from the purchase invoice header record.
OnAfterCopyFieldsFromPurchaseCrMemoHeader(var CCHRequestLine: Record "CCH Request Line"; var PurchaseCrMemoHeader: Record "Purch. Cr. Memo Hdr.) - Event after the request line has been initialized from the purchase credit memo header record.
OnAfterCopyFieldsFromServiceHeader(var CCHRequestLine: Record "CCH Request Line"; var ServiceHeader: Record "Service Header) - Event after the request line has been initialized from the service header record.
OnAfterCopyFieldsFromServiceInvoiceHeader(var CCHRequestLine: Record "CCH Request Line"; var ServiceInvoiceHeader: Record "Service Invoice Header) - Event after the request line has been initialized from the service invoice header record.
OnAfterCopyFieldsFromServiceCrMemoHeader(var CCHRequestLine: Record "CCH Request Line"; var ServiceCrMemoHeader: Record "Service Cr.Memo Header) - Event after the request line has been initialized from the service credit memo header record.
OnAfterCopyFieldsFromSalesLine(var CCHRequestLine: Record "CCH Request Line"; var SalesLine: Record "Sales Line") - Event after the request line has been initialized from the sales line record.
OnAfterCopyFieldsFromSalesInvoiceLine(var CCHRequestLine: Record "CCH Request Line"; var SalesInvoiceLine: Record "Sales Invoice Line") - Event after the request line has been initialized from the sales invoice line record.
OnAfterCopyFieldsFromSalesCrMemoLine(var CCHRequestLine: Record "CCH Request Line"; var SalesCrMemoLine: Record "Sales Cr.Memo Line") - Event after the request line has been initialized from the sales credit memo line record.
OnAfterCopyFieldsFromPurchaseLine(var CCHRequestLine: Record "CCH Request Line"; var PurchaseLine: Record "Purchase Line") - Event after the request line has been initialized from the purchase line record.
OnAfterCopyFieldsFromPurchaseInvoiceLine(var CCHRequestLine: Record "CCH Request Line"; var PurchaseInvoiceLine: Record "Purch. Inv. Line") - Event after the request line has been initialized from the purchase invoice line record. OnAfterCopyFieldsFromPurchaseCrMemoLine(var CCHRequestLine: Record "CCH Request Line"; var PurchaseCrMemoLine: Record "Purch. Cr. Memo Line") - Event after the request line has been initialized from the purchase credit memo line record.
OnAfterCopyFieldsFromServiceLine(var CCHRequestLine: Record "CCH Request Line"; var ServiceLine: Record "Service Line") - Event after the request line has been initialized from the service line record.
OnAfterCopyFieldsFromServiceInvoiceLine(var CCHRequestLine: Record "CCH Request Line"; var ServiceInvoiceLine: Record "Service Invoice Line") - Event after the request line has been initialized from the service invoice line record.
OnAfterCopyFieldsFromServiceCrMemoLine(var CCHRequestLine: Record "CCH Request Line"; var ServiceCrMemoLine: Record "Service Cr.Memo Line") - Event after the request line has been initialized from the service credit memo line record.
Codeunit "CCH Sales Line Events"
OnAfterCreateDocumentTaxLine(var CCHDocumentTaxLine: Record "CCH Document Tax Line"; var SalesLine: Record "Sales Line") - Event after the SureTax line settings are initialized for a sales line.
OnAfterUpdateDocumentTaxLine(var CCHDocumentTaxLine: Record "CCH Document Tax Line"; var SalesLine: Record "Sales Line") - Event after the SureTax line settings are updated for a sales line.
Codeunit "CCH Purchase Line Events"
OnAfterCreateDocumentTaxLine(var CCHDocumentTaxLine: Record "CCH Document Tax Line"; var PurchaseLine: Record "Purchase Line") - Event after the SureTax line settings are initialized for a purchase line.
OnAfterUpdateDocumentTaxLine(var CCHDocumentTaxLine: Record "CCH Document Tax Line"; var PurchaseLine: Record "Purchase Line") - Event after the SureTax line settings are updated for a purchase line.
Codeunit "CCH Service Line Events"
OnAfterCreateDocumentTaxLine(var CCHDocumentTaxLine: Record "CCH Document Tax Line"; var ServiceLine: Record "ServiceLine") - Event after the SureTax line settings are initialized for a service line.
OnAfterUpdateDocumentTaxLine(var CCHDocumentTaxLine: Record "CCH Document Tax Line"; var ServiceLine: Record "Service Line") - Event after the SureTax line settings are updated for a service line.
Codeunit "CCH Calculate Tax Events-Base"
OnBeforeInsertSummarizedSalesTaxTable(var SummarizedSalesTaxAmtLine: Record "Sales Tax Amount Line"; var TempCCHResponseLineTaxDetail: Record "CCH Response Line Tax Detail" temporary) - Event before the tax information is inserted into the summarized tax table.
OnBeforeModifySummarizedSalesTaxTable(var SummarizedSalesTaxAmtLine: Record "Sales Tax Amount Line"; var TempCCHResponseLineTaxDetail: Record "CCH Response Line Tax Detail" temporary) - Event before the tax information is modified in the summarized tax table.
Codeunit "CCH Address Management"
LookForAddress(Address1: Text; Address2: Text; City: Text; County: Text; State: Text; PostCode: Code[20]; Plus4: Code[4]; Country: Text; CreateIfNotFound: Boolean) - Returns a GUID that corresponds to the given address in the CCH Address table.
Codeunit "CCH Tax API"
CreateSureTaxRequestHeader(SourceType: Integer; SourceSubtype: Option; SourceID: Code [35]; ...) - Creates a request header record for the given document. A request header must be created before request lines are created.
CreateSureTaxRequestLine(SourceType: Integer; SourceSubtype: Option; SourceID: Code[35]; LineNumber: Integer; ...) - Creates a request line record for the given document line. A request must contain at least one line.
SetRequestLineDataExchangeValues(SourceType: Integer; SourceSubtype: Option; SourceID: Code[35]; LineNumber: Integer; ...) - Sets data exchange fields for the given request line.
GetCCHRequestHeader(SourceType: Integer; SourceSubtype: Option; SourceID: Code[35]; var CCHRequestHeader: Record "CCH Request Header) - Gets the request header record for the given document.
GetCCHRequestLine(SourceType: Integer; SourceSubtype: Option; SourceID: Code[35]; LineNumber: Integer; var CCHRequestLine: Record "CCH Request Line") - Gets the request line record for the given document line.
CalculateTax(CCHRequestHeader: Record "CCH Request Header") - Calculates tax for the given request header.
GetHeaderTax(CCHRequestHeader: Record "CCH Request Header") - Gets the total tax for the given request header.
GetLineTax(CCHRequestLine: Record "CCH Request Line") - Gets the tax amount for the given request line.
GetHeaderMessage(CCHRequestHeader: Record "CCH Request Header) - Gets the message returned by SureTax for the given request header.
GetLineMessage(CCHRequestLine: Record "CCH Request Line") - Gets the message returned by SureTax for the given request line.
ClearTables(SourceType: Integer; SourceSubtype: Option; SourceID: Code[35]) - Clears the request and response tables for the given document.