CCH® SureTax® for Microsoft Dynamics AX User Guide
Updated: November 22, 2016
Chapter 1 - Installation and Basic Configuration
Overview
CCH SureTax for Microsoft Dynamics AX is a plug-in that integrates the CCH SureTax solution with Microsoft Dynamics AX. With CCH SureTax Sales Component for Microsoft Dynamics AX installed, you can accurately calculate sales tax for the United States and Canada and manage your sales tax compliance without the need to maintain sales tax rates inside Dynamics AX.
The CCH SureTax for Microsoft Dynamics AX product includes three components that can be installed separately:
- Sales. Allows you to manage your sales tax compliance in the Accounts Receivable module of Dynamics AX.
- Purchasing. Allows you to manage your sales tax compliance in the Accounts Payable module of Dynamics AX.
- Project. Allows you to manage sales tax for both expense and sales transactions in the Projects module of Dynamics AX.
How It Works
When you compute the sales tax on a transaction in Microsoft Dynamics AX, the CCH SureTax for Microsoft Dynamics AX plug-in sends the transaction information from Dynamics AX through SureTax Web Services to the main CCH SureTax application. The calculated sales tax is sent back to Dynamics AX through SureTax Web Services. If needed, you can view the results of the CCH SureTax calculation from the Microsoft Dynamics AX Temporary Sales Transactions form before posting the transaction.
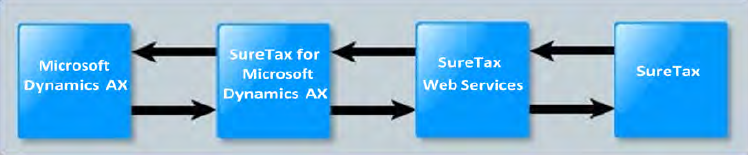 Figure 1: Information flow when using the CCH SureTax for Microsoft Dynamics AX plug-in.
Features
With CCH SureTax for Microsoft Dynamics AX, you can do the following:
- Manage sales tax for transactions created on any of the following Microsoft Dynamics AX forms:
- Sales order
- Sales quotation
- Free text Invoice
- Purchase order
- Purchase requisition
- Vendor invoice
- Invoice Journal
- Invoice Register
- Project Quotation
- Invoice proposal
- Expense journal
- Input multiple addresses for each line item in a transaction.
- Include Dynamics AX discounts in line item amounts.
- Include miscellaneous charges in sales tax calculations.
- Assign stock keeping units (SKUs) to product groups, product items, sales categories, and miscellaneous charges in the CCH SureTax portal.
- Display detailed results of the sales tax calculation on the Microsoft Dynamics AX Temporary Sales Tax Transaction form.
- Use price includes sales tax functionality on Sales Quotations and Sales Orders.
- Calculate both the standard Dynamics AX sales tax and the plug-in sales tax on the same order.
Installing
Each component in the CCH SureTax for Microsoft Dynamics AX plug-in must be installed separately. The installation procedures in this section assume that no other plug-in has been installed. Once you have installed one component, some installation steps will not be necessary for subsequent installations.
Specific details are provided as part of the installation procedure for the sales component.
Important: The instructions in this section apply to a Dynamics AX system that does not contain other customizations. If your system has other customizations, the CCH SureTax for Microsoft Dynamics AX code must be carefully merged.
Before installing the plug-in, confirm that you have the correct plug-in version for your Dynamics AX installation. Our install wizards will provide options to install for different versions of AX. To do so, select Help > About Microsoft Dynamics AX and verify the application version is the same version you select on the installation wizard.
Suggested Installation Workflow
Running the installation wizard for a component installs the items needed to integrate the component into Microsoft Dynamics AX. After the installation wizard has completed, additional imports and customizations are needed before the component can be configured and used. We recommend completing the following steps in the order listed before you attempt to use CCH SureTax for Microsoft Dynamics AX:
- Run the installation wizard for each component your company has purchased. Instructions for using the installation wizards are included in the next section.
- Import the customizations and install the AX certificate. The customizations are included as model files that must be imported into the Dynamics AX model store. The AX certificate must also be installed. If necessary, any objects with conflicting modifications will need to be resolved.
- Compile and synchronize. After customizations have been imported into Dynamics AX, the Dynamics AX application must be compiled and synchronized.
- Perform setup. A setup workflow is outlined in the section Suggested Workflow for Setup on page 11.
Running the Installation Wizards
Running the Sales Installation Wizard
Separate installation wizards are supplied for each component of the plug-in. The installation wizards install the custom code files to the system. After the installation wizards have been run, the custom code files must be imported into the Dynamics AX system.
- Double-click the installation file
CCH® SureTax® for Dynamics AX 2012 Sales.exeto launch the Installation Wizard. The Welcome to the InstallShield Wizard for SureTax for Dynamics AX 2012 Sales screen displays. - Click Next. The Setup Type screen displays.
- Select the ERP version and click Next.
- Verify that the location displayed in the Install to section is the location where you want to install the component. To change the default installation directory, do the following:
- Click Change.
- Use the Look in field to navigate to and select the location where you want to install the component.
- Click OK.
- Click Next.
- Select the Check to install AX help server files box.
- If necessary, add or edit the location on the server where the help files should be stored.
- Click Next.
- Click Install to begin the installation.
- Click Finish when the wizard has completed. The following items are installed on your system:
- Customization files. These files contain information specific to the component you are installing. For the sales component, these files include:
CCH.SureTax.Base.axmodelCCH.SureTax.BaseSales.axmodelCCH.SureTax.Sales.axmodel
- User guide and Help files. These documents are provided for your reference.
- Security Certificate.
CCH Incorporated.ceris installed in the certificate manager under the Trusted Root Certificate store. - IDMF templates. These files are used for archiving and purging data.
- Customization files. These files contain information specific to the component you are installing. For the sales component, these files include:
Running the Purchasing Installation Wizard
Separate installation wizards are supplied for each component of the plug-in. The installation wizards install the custom code files to the system. After the installation wizards have been run, the custom code files must be imported into the Dynamics AX system.
- Double-click the installation file
CCH® SureTax® for Dynamics AX 2012 Purchasing.exeto launch the Installation Wizard. The Welcome to the InstallShield Wizard for SureTax for Dynamics AX 2012 Purchasing screen displays. - Click Next. The Setup Type screen displays.
- Select the ERP version and click Next.
- Verify that the location displayed in the Install to section is the location where you want to install the component. To change the default installation directory, do the following:
- Click Change.
- Use the Look in field to navigate to and select the location where you want to install the component.
- Click OK.
- Click Next.
- Select the Check to install AX help server files box.
- If necessary, add or edit the location on the server where the help files should be stored.
- Click Next.
- Click Install to begin the installation.
- Click Finish when the wizard has completed. The following items are installed on your system:
- Customization files. These files contain information specific to the component you are installing. For the purchasing component, these files include:
CCH.SureTax.Base.axmodelCCH.SureTax.BasePurchases.axmodelCCH.SureTax.Purchases.axmodel
- User guide and Help files. These documents are provided for your reference.
- Security Certificate.
CCH Incorporated.ceris installed in the certificate manager under the Trusted Root Certificate store. - IDMF templates. These files are used for archiving and purging data.
- Customization files. These files contain information specific to the component you are installing. For the purchasing component, these files include:
Running the Projects Installation Wizard
Separate installation wizards are supplied for each component of the plug-in. The installation wizards install the custom code files to the system. After the installation wizards have been run, the custom code files must be imported into the Dynamics AX system.
- Double-click the installation file
CCH® SureTax® for Dynamics AX 2012 Projects.exeto launch the Installation Wizard. The Welcome to the InstallShield Wizard for SureTax for Dynamics AX 2012 Projects screen displays. - Click Next. The Setup Type screen displays.
- Select the ERP version and click Next.
- Verify that the location displayed in the Install to section is the location where you want to install the component. To change the default installation directory, do the following:
- Click Change.
- Use the Look in field to navigate to and select the location where you want to install the component.
- Click OK.
- Click Next.
- Select the Check to install AX help server files box.
- If necessary, add or edit the location on the server where the help files should be stored.
- Click Next.
- Click Install to begin the installation.
- Click Finish when the wizard has completed. The following items are installed on your system:
- Customization files. These files contain information specific to the component you are installing. For the projects component, these files include:
CCH.SureTax.Base.axmodelCCH.SureTax.BaseSales.axmodelCCH.SureTax.BasePurchases.axmodelCCH.SureTax.Projects.axmodel
- User guide and Help files. These documents are provided for your reference.
- Security Certificate.
CCH Incorporated.ceris installed in the certificate manager under the Trusted Root Certificate store. - IDMF templates. These files are used for archiving and purging data.
- Customization files. These files contain information specific to the component you are installing. For the projects component, these files include:
Importing Customizations
The code customizations that provide sales tax calculation functionality inside Dynamics AX are available as model files. Depending on which plug-in components have been installed, different model files must be imported into the system. The recommended approach for importing model files into Dynamics AX is using Microsoft Dynamics AX 2012 Management shell. The following instructions give basic information about using the Install-AXModel PowerShell command to install the plug-in model files. For more information about advanced features of the Install-AXModel PowerShell command or other methods of installing model files, see the Microsoft Dynamics AX documentation.
Select Start > Administrative Tools > Microsoft Dynamics AX 2012 Management Shell. The command prompt 'PS C:\Windows\system32>' gets launched.
To install the plug-in model files, use the following command at the Dynamics AX Management Utilities command prompt:
$folderPath = "C:\Program Files (x86)\CCH\SureTax Office for Dynamics AX 2012\AX 2012 R3 CU9"
# Import the Sure Tax model.
$baseFile = $folderPath + "CCH.Base.Sales.axmodel"
Install-AXModel -File $baseFile -Conflict push -Config MicrosoftDynamicsAX
A message displays informing you that the model is signed by Verisign Inc.
Enter Y and press Enter.
Once Model files are imported, close Microsoft Dynamics AX 2012 Management Shell.
Restart the AOS.
Repeat the following command for each plug-in model file to be installed, replacing
<MDL>with the fully qualified path to the plug-in model file:Install-AXModel -File <MDL> -Conflict push -TargetLayer <LYR>The following are the default fully qualified paths to the Sales component model files:
C:\Program Files (x86)\Wolters Kluwer\CCH® SureTax® for Dynamics AX\SureTax.Base.axmodelC:\Program Files (x86)\Wolters Kluwer\CCH® SureTax® for Dynamics AX\SureTax.BaseSales.axmodelC:\Program Files (x86)\Wolters Kluwer\CCH® SureTax® for Dynamics AX\SureTax.Sales.axmodelC:\Program Files (x86)\Wolters Kluwer\CCH® SureTax® for Dynamics AX\SureTax.Units.axmodel
The following are the default fully qualified paths to the Purchasing component model files:
C:\Program Files (x86)\Wolters Kluwer\CCH® SureTax® for Dynamics AX\SureTax.Base.axmodelC:\Program Files (x86)\Wolters Kluwer\CCH® SureTax® for Dynamics AX\SureTax.BasePurchase.axmodelC:\Program Files (x86)\Wolters Kluwer\CCH® SureTax® for Dynamics AX\SureTax.Purchase.axmodel
The following are the default fully qualified paths to the Projects component model files:
C:\Program Files (x86)\Wolters Kluwer\CCH® SureTax® for Dynamics AX\SureTax.Base.axmodelC:\Program Files (x86)\Wolters Kluwer\CCH® SureTax® for Dynamics AX\SureTax.BaseSales.axmodelC:\Program Files (x86)\Wolters Kluwer\CCH® SureTax® for Dynamics AX\SureTax.BasePurch.axmodelC:\Program Files (x86)\Wolters Kluwer\CCH® SureTax® for Dynamics AX\SureTax.Proj.axmodel
Installing the AX Certificate
To install the AX Certificate, do the following:
- Go to System Administration > Setup > Licensing > License Information and browse to the file.
- Click Load License File.
- Navigate to the License file.
- After you select the file, a message displays asking if you would like to synchronize now or later. The certificate will not be effective until after you synchronize.
- Click Yes.
- After synchronization is done, verify the Correct license value for Sure tax License Code loaded message displays.
- Close AX and restart the AOS.
Identifying Conflicts
To identify conflicts, do the following:
- Once the models are installed, select About Microsoft Dynamics AX from the Help menu.
- Click Show installed models. In the popup, you can see all installed models. If there is conflict for any model, it will be displayed as Conflict in the brackets.
Resolving Conflicts
If conflicts are found between objects in the plug-in model files and the objects in any other model in Dynamics AX, they are placed in a new model in the current patch layer (or the layer specified using the -TargetLayer switch). To resolve the conflicts, do the following:
- Restart Dynamics AX AOS.
- Open the Dynamics AX development environment.
- Select Tools > Model management > Models installed. Find the name of any conflict model that was created while importing the plug-in models.
- Select Tools > Model management > Model elements.
- Right-click the Model field (inside the grid) and select Filter by field.
- Enter the name of the conflict models and click OK to filter the grid and display only the conflicting elements.
- For each conflicting element, do the following to resolve the conflict:
- Click Open new window to access the object in the AOT.
- Right-click the object and select Compare to see the differences between the resource in the patch layer and the resource in the main layer.
- Resolve the conflict by merging the conflicting code. For more information on merging conflicts, see the Microsoft Dynamics AX documentation.
Compiling and Synchronizing the Dynamics AX Application
After customizations have been imported into Dynamics AX, the application must be compiled and the database must be synchronized. Do the following to compile and synchronize the Dynamics AX application:
- Restart the Dynamics AX AOS.
- Start the Dynamics AX Client.
- Select System Administration > Periodic > Compile application. A message asks if you want to continue.
- Click Yes.
- Select System Administration > Periodic > Database > SQL administration. The SQL administration form opens.
- Select the All tables node.
- Select the Table Actions drop down arrow.
- Select Synchronize database. The synchronize table progress bar displays. The synchronization takes approximately 15 to 20 minutes to complete.
- After synchronization is complete, restart the AOS.
- Select CCH > SureTax > Basic > About Sure Tax to open the About SureTax form. An additional required compilation procedure begins. When the compilation procedure is complete, the About SureTax form opens.
- Restart the Dynamics AX AOS.
- Select System Administration > Periodic > Compile into .NET Framework CIL. A message asks if you want to continue.
- Click Yes.
- Restart the Dynamics AX AOS.
Merging the CCH Menus
After the model files are successfully imported, the CCH menus must be manually merged into the Menus folder.
- Open the AOT.
- Expand the Menus folder.
- Right-click the MainMenu folder.
- Go to New > Menu reference and view the Select: Menus window.
- Select the SureTaxCorpSystem folder and drag it underneath the MainMenu folder.
- Select the folders that correspond to the modules you are installing, and then drag them underneath the SureTaxMenu folder.
- Click Save.
- Close and reopen AX.
Synchronizing Clients
After customizations have been imported into Dynamics AX and the application has been compiled and synchronized, do the following to synchronize AX clients:
- Run the plug-in installation wizard on each AX client machine. Running the installation wizard on the AX client machine deploys the required DLL into the local machine's global assembly cache. Note: The plug-in installation wizard needs to be run only on the client machines for all modules.
- Delete any application object cache files from the user's local application data folder. Depending on the operating system, the AUC files may be found in one of the following folders:
C:\Documents and Settings\<user>\Local Settings\Application DataC:\Users\<user>\AppData\Local\Note: The user application data folder is a hidden system folder. To view hidden folders, click Tools > Folder options and select Show all folders.
Using the CCH SureTax Plug-in Menu
After installing and compiling the customizations, a new menu item for the SureTax plug-in is accessible through the Dynamics AX Navigation pane. This menu is labeled CCH, and it contains the CCH SureTax setup and maintenance forms for the components that you have installed.
If you do not see the CCH menu in the list of menus in the Dynamics AX Navigation pane, click the down arrow at the bottom of the Navigation pane and select Navigation Pane Options. In the window that displays, scroll down and select CCH, and then click OK. The CCH menu is added to the Navigation pane.
Basic Setup
The following sections contain information about the basic setup that you must perform before you can use CCH SureTax for Microsoft Dynamics AX to calculate sales tax.
Suggested Workflow for Setup
- Review the next section, Before You Set Up CCH SureTax for Microsoft Dynamics AX. This section contains information that will be useful during setup.
- Configure the system-level settings. In this step, you identify the location where SureTax Web Services is installed and then import the system data, among other tasks. See Configuring System Level Settings on page 14 for details.
- Configure the tax codes and tax groups. See Configuring or Modifying Tax Codes and Tax Groups on page 15 for details.
Before You Set Up CCH SureTax for Microsoft Dynamics AX
We recommend that you review the information in this section before attempting to set up the CCH SureTax for Microsoft Dynamics AX plug-in.
General Ledger Parameters
CCH SureTax for Microsoft Dynamics AX calculates tax at the line item level. In order for the plug-in to update tax amounts in AX correctly, the Calculation method setting in the AX General ledger parameters must be set to Line. This setting can be accessed by selecting General ledger > Setup General ledger parameters and clicking the Sales tax tab.
Dates Recorded in CCH SureTax
Before using CCH SureTax for Dynamics AX, it is important to understand the difference between the CCH SureTax Transaction Date and the CCH SureTax Invoice Date fields.
- CCH SureTax Transaction Date is stored in CCH SureTax for each transaction and specifies the period in which the transaction should be selected for liability reports. CCH SureTax for Dynamics AX always sends the AX Invoice Date to CCH SureTax as the Transaction Date. This ensures that reports from AX contain the same transactions as reports from CCH SureTax.
- CCH SureTax Invoice Date is stored in CCH SureTax for each transaction. CCH SureTax uses this date to determine the effective tax rate used in the tax calculation. The value that is sent to CCH SureTax as the Invoice Date is determined by the Calculation Date Type parameter.
For Accounts Receivable and Accounts Payable, this setting is on the General Ledger Parameters form under the Sales Tax tab. The following options are available:
- Document Date: If document date is selected, the date the document was created will be sent as the CCH SureTax Invoice Date. If there is a tax rate change between the time a document is created and the time the invoice is posted, selecting this setting will cause the transaction to be calculated with the rate at the time the document was created, but it will be reported in the period when the invoice was posted.
- Delivery Date: If delivery date is selected, the date a line item is delivered will be sent as the CCH SureTax Invoice Date. If there is a tax rate change between the time a document is delivered and the time the invoice is posted, selecting this setting will cause the transaction to be calculated with the rate at the time the items were delivered, but it will be reported in the period when the invoice was posted.
- Invoice Date: If invoice date is selected, the date an AX invoice is generated will be sent as the CCH SureTax Invoice Date.
For Projects, the tax calculation date setting is on the Project Management and Accounting Parameters form under the Financial tab. The following options are available:
- Project Date: If project date is selected, the date a project was created will be sent as the CCH SureTax Invoice Date. If there is a tax rate change between the time a project is created and the time a project invoice is posted, selecting this setting will cause the transaction to be calculated with the rate at the time the project was created, but it will be reported in the period when the invoice was posted.
Business Rules for the CCH SureTax Plug-in
For the plug-in to function correctly, CCH SureTax must be configured as follows:
- The CCH SureTax URL must be entered.
- The CCH SureTax client number must be set.
- The CCH SureTax validation key must be entered.
- The CCH SureTax data URL must be entered.
About the CCH SureTax Security Roles
Custom security roles are included with the plug-in for managing user access to plug-in functionality. For each component of the plug-in a normal user and a power user role is available. Assign CCH SureTax Power User roles to users who should have access to edit plug-in settings. Assign the CCH SureTax User roles to those users who should have read only access to plug-in settings.
Note: For more information on security roles, see the Dynamics AX documentation.
About Tax Exempt Numbers and Tax Exemption Codes
When you set up CCH SureTax for Microsoft Dynamics AX, a tax exemption code should be sent to CCH SureTax when calculating sales tax. Exemption codes provide information to CCH SureTax about the sales taxes that are applicable for the transaction.
Tax exemption code originate in CCH SureTax and provide a way to indicate which sales taxes should be applied to a transaction. SureTax includes a standard set of exemption classes, as shown in the following table.
Tax exempt numbers are created in Microsoft Dynamics AX. For CCH SureTax to use the tax exempt number to compute sales tax, the tax exempt number must either correspond with one of the standard CCH SureTax exemption codes shown in the table below, or a custom exemption must be created in CCH SureTax for that tax exempt number.
| Exemption Code | Exemption |
|---|---|
| 00 | No Exemptions |
| 01 | Federal Excise Tax Exempt |
| 02 | State Taxes Exempt |
| 03 | Federal Excise Tax and State Taxes Exempt |
| 04 | State and Local Taxes Exempt |
| 05 | Federal Excise Tax and State and Local Taxes |
| 06 | All Federal Level Taxes Exempt |
| 07 | All Federal Level Taxes Exempt |
| 09 | All Unit Based Taxes Exempt |
| 10 | All Unit Based Taxes Exempt |
| 11 | Unit Based E911 Exempt |
| 12 | Only Apply Unit Based Fees |
| 13 | Local Right of Way Fees (ROW) Exempt |
| 14 | All State and Local E911s Exempt |
| 19 | Only Apply Federal Universal Service Fund (USF) |
| 20 | All PUC Fees Exempt |
| 21 | All State and Local Gross Receipts Tax (GRT) Exempt |
| 22 | All State Universal Service Fund (USF) Fees Exempt |
| 23 | State Gross Receipts Tax and Universal Service Fund Exempt |
| 24 | Federal Universal Service Fund (USF) Exempt |
| 25 | Federal Excise, Federal Universal Service Fund (USF) and State Sales Tax Exempt |
| 26 | State Excise Tax Exempt (includes FL CST) |
| 27 | Federal Excise, Federal USF and Local Sales Tax Exempt |
| 28 | Federal USF and State Local Sales Tax Exempt |
| 29 | Federal USF and Local Sales Tax Exempt |
| 30 | State Excise and Local Telecommunications Tax Exempt |
| 31 | State Level Sales Tax Exempt |
| 32 | State and Local Sales Tax Exempt |
| 33 | Federal Excise, Federal USF, State and Local Sales Tax Exempt |
| 35 | Federal TRS (Federal Regulatory Assessment Fee) Exempt |
| 36 | Value Added Tax (VAT) |
| 37 | Canadian Provincial Service Taxes (PST) Exempt |
| 38 | Canadian Harmonized Service Taxes (HST) Exempt |
| 39 | Canadian Goods and Services Taxes (GST) Exempt |
| 41 | Local Utility Users Tax Exempt |
| 42 | State Excise Tax Exempt and Local Surcharge Exempt |
| 43 | Universal Lifeline Telephone Service Surcharge (ULTS) exempt |
| 44 | City Level Taxes Exempt |
| 45 | State Franchise Fee |
| 46 | Local Franchise Fee |
| 47 | County Level Taxes Exempt |
| 61 | Los Angeles Communications Users Tax Exempt |
| 62 | Non-unit taxes exempt except for E911 |
| 99 | All Taxes Exempt - Apply no tax or fees |
Assigning an Exemption Code to a Dynamics AX Tax Exempt Number
You can associate an exemption code to a Microsoft Dynamics AX tax exempt number. If you do so, then the exemption code assigned to the tax exempt number is defaulted onto transaction forms for customers or vendors that have the exemption number. See Mapping Tax Exemption Number to Tax Exemption Code on page 19 for more information.
Configuring System Level Settings
Select the CCH menu in the Microsoft Dynamics AX Navigation Pane.
In the Forms section of the navigation pane, select CCH SureTax > Basic > SureTax Basic Setup > General.
Select options for each of the fields in the General section. The items that are available in each field depend on which packages of CCH SureTax data your company has purchased. The fields in this section are as follows:
- CCH SureTax URL
- CCH SureTax client number
- CCH SureTax validation key
- CCH SureTax data URL
Note: If you do not know the location for the Web service, your CCH Training and Consulting representative can assist you in identifying this location. If there is a problem accessing the CCH SureTax Web Services server, you must resolve the issue before you can continue with this procedure.
Click Import system data and configure the Import System Data task. CCH SureTax for Microsoft Dynamics AX connects with SureTax Web Services and imports the data required to complete the setup. The Import System Data Task opens.
- Configure the batch processing setting.
- Enter a task description.
- Configure the batch group and privacy settings.
- Click Alerts and configure alerts for the batch job.
- Click Recurrence and configure the recurrence pattern.
Configuring or Modifying Tax Codes and Tax Groups
Before using CCH SureTax with Microsoft Dynamics AX, you must configure sales tax codes and groups. Part of the setup process is selecting how sales tax should be credited to general ledger accounts. You can select from either of the following two options:
- Breakdown by state and country: When this option is selected, a separate tax group is created for each U.S. state, for each Canadian province, and for other supported countries, and sales tax will be credited to a general ledger account based on the state or province where the sales tax is applied.
- Single sales tax group: A single sales tax group will be created. STALL will contain the required tax codes for U.S. and Canada.
The other setup that is necessary for the tax codes depends on which of these options you select. Detailed instructions for both options are included below.
Configuring Tax Codes and Groups by State
Use the following procedure to set up tax codes and tax groups if you want to credit sales tax to different general ledger accounts based on the state where tax is applied.
Select the CCH menu in the Microsoft Dynamics AX Navigation Pane.
In the Forms pane, expand Basic, and then open the SureTax Basic Setup form.
Select the Tax Code Setup tab.
In the Tax Setup Option section, select Breakdown by state and country.
If needed, select default options to be used for all the states or provinces in the Default from section. You can select from the following defaults:
- Ledger posting group: The options available here are set up in General Ledger > Setup > Sales Tax > Ledger posting groups.
- Settlement period: The options available here are set up in General Ledger > Setup > Sales Tax > Sales tax settlement periods.
- Currency: The options available here are set up in General Ledger > Setup > Exchange rates.
Note: You can override the defaults by selecting different options for individual states or provinces in the Tax code settings grid.
To apply a default you selected in the previous step, click Assign default value, and then select the default option to apply. Repeat this step for each default that you want to apply.
In the Tax code settings grid, select the box for each state, province, or country for which you are setting up tax codes.
Note: You can click Select All to select all states, provinces, and countries, or you can click Deselect All to clear the selection for all.
If you are not using default options, or if you need to override default options for some states, provinces, or countries, select options for each of the following fields in the Tax code settings grid:
- Ledger posting group: The options available here are set up in General Ledger > Setup > Sales Tax > Ledger posting groups.
- Settlement period: The options available here are set up in General Ledger > Setup > Sales Tax > Sales tax settlement periods.
- Currency code: The options available here are set up in General Ledger > Setup > Exchange rates.
Click Update to apply the tax code settings that you have selected.
Note: We recommend that you run the update as a batch job so that it can execute on a scheduled basis. That way when the appropriate tax names change for any of the selected tax authorities, the scheduled update will create new tax groups and tax codes referencing the new name. It is also important the import system data job is executed in the same frequency so that the new tax names can be downloaded from CCH SureTax.
Configuring Tax Codes and Groups for a Single Sales Tax Group
Use the following procedure to set up tax codes and tax groups if you want to credit all sales tax to a single account.
Select the CCH menu in the Microsoft Dynamics AX Navigation Pane.
In the Forms pane, go to SureTax > Basic, and then select SureTax Tax Setup. The SureTax Tax Setup form displays.
Select Single sales tax group in the Tax setup option section.
In the Tax code settings section, select an option for each of the following:
- Ledger posting group: The options available here are set up in General Ledger > Setup > Sales Tax > Ledger posting groups.
- Settlement period: The options available here are set up in General Ledger > Setup > Sales Tax > Sales tax settlement periods.
- Currency code: The options available here are set up in General Ledger > Setup > Exchange rates.
Click Update to apply the tax code settings.
Configuring Custom Tax Codes
As taxes are calculated, CCH SureTax returns tax types. By default, tax types are mapped back to the following default tax codes for each tax group.
Canada
- Goods and Services tax (GST)
- Federal Regulatory Assessment Fees (FRAF)
- Federal Universal Service Fund (FUSF)
- State and Local Regulatory Fees and Surcharges (SLRS)
- Telecommunications and Excise Tax (TEX)
United States
- Federal Regulatory Assessment Fees (FRAF)
- Federal Universal Service Fund (FUSF)
- Sales Tax (S)
- Use Tax (U)
- State and Local Regulatory Fees and Surcharges (SLRS)
- Telecommunications and Excise Tax (TEX)
VAT Countries
- Value Added Tax (VAT)
When Single Sales tax group is selected in Tax Setup:
- Single Sales tax group
- Sales Tax (S)
- Use Tax (U)
- Federal Regulatory Assessment Fees (FRAF)
- Federal Universal Service Fund (FUSF)
- State and Local Regulatory Fees and Surcharges (SLRS)
- Telecommunications and Excise Tax (TEX)
- Goods and Services Tax (GST)
- Value Added Tax (VAT)
As transactions are invoiced, each applicable tax code is listed as a separate line on the temporary sales tax transaction window, posted invoice journal, printed invoice. Use the following procedure to create new tax codes and change the tax type associations in order to have the desired tax codes for reporting.
Select the CCH menu in the Microsoft Dynamics AX Navigation Pane.
In the Forms pane, go to SureTax > Basic, and then select SureTax Basic Setup. The SureTax Setup form displays.
Select the Tax Code setup tab.
Select Single sales tax group or Breakdown by state and country in the Tax setup option section.
Select Custom tax code options.
If the Breakdown by state and country option is selected in Tax Setup, choose the following. This step does not apply if Single Sales Tax Group is selected in Tax Setup.
- Country
- State
Note: For VAT countries, the State field will be blank.
Configure the following fields in the Custom Tax code settings grid:
- Sales tax code
- Name
- Tax types
If you need to override default options for some tax codes, select options for each of the following fields in the Custom Tax code settings grid:
- Ledger posting group: The options available here are set up in General Ledger > Setup > Sales Tax > Ledger posting groups.
- Settlement period: The options available here are set up in General Ledger > Setup > Sales Tax > Sales tax settlement periods.
- Currency code: The options available here are set up in General Ledger > Setup > Exchange rates.
Close the form to save the settings.
Re-adding Tax Codes
In the Custom Tax code grid, Sales tax codes disappear from the grid when all the tax types associated with the tax code are unassociated.
To re-add the default tax codes, do the following:
- Navigate to the Default forms section under the Tax code setup tab on the SureTax basic setup form.
- Click Update.
- Navigate to the Custom tax code options section under the Tax code setup tab on the SureTax basic setup form.
- Re-add the tax code.
To re-add the custom tax codes, do the following:
- Navigate to the Item sales tax groups form.
- Under the Setup tab, remove the sales tax code.
- Navigate to the Sales tax groups form.
- Select Sales tax group and do one of the following:
- If removing from state and country sales tax group, select the sales tax group for the state and country.
- If removing from single sales tax group, select STAll.
- Under the Setup tab, remove the intended sales tax code.
- Navigate to the Sales tax codes form.
- Remove the intended sales tax code.
- Navigate to the Custom tax code options section under the Tax code setup tab on the SureTax basic setup form.
- Re-add the tax code.
Mapping Tax Exemption Number to Tax Exemption Code
If needed, you can assign tax exemption codes to individual tax exempt numbers by doing the following:
- Select the General Ledger menu in the Dynamics AX Navigation pane.
- In the Forms pane, go to Setup > Sales Tax > External, and then select Tax exempt numbers. The Tax exempt numbers form displays.
- Select the tax exempt number for which you are assigning a tax exemption code.
- Click the General tab.
- In the Tax exemption code section column, select a tax exemption code from the list.
- Note: Items listed in the tax exemption code field are set up in the main CCH SureTax application.
- Close the form to save the tax exemption code assignments.
Chapter 2 - Configuring and Using the Sales Component
Overview
The Sales component of the CCH SureTax for Microsoft Dynamics® AX plug-in integrates with the Dynamics AX Accounts Receivable module. It provides tools for managing sales tax compliance on the sales side of your business.
The first half of this chapter explains how to configure the options that impact the Sales component. The setup process includes selecting options in the CCH SureTax plug-in, as well as setting defaults on some standard Dynamics AX forms.
The second half of the chapter, titled Using the Sales Component, includes information about using CCH SureTax options when entering transactions into Microsoft Dynamics AX. This section also describes how to view sales taxes prior to posting and how to post the sales tax transactions.
Configuring the CCH SureTax Sales Component
Before using the Sales component of the CCH SureTax for Microsoft Dynamics AX plug-in, you must do the following:
- Configure the options in the Sales component. See Basic Setup of the Sales Component on the next page for more information.
- Set default values for CCH SureTax fields that have been added to the following standard Microsoft Dynamics AX forms:
- Customer form. On this form, you can set the sales tax options for specific customers as needed. See Setting CCH SureTax Options for a Customer on the Dynamics AX Customer Form on page 26 for more information.
- Released products. On this form, you can set the sales tax options for specific products as needed. See Setting Sales Tax Options for a Product on the Dynamics AX Released Products Form on page 26 for more information.
- Category Hierarchy. On this form, you can set the sales tax options for specific categories as needed. See page Setting Sales Tax Options for Sales Category on the Dynamics AX Category Hierarchy Form on page 27 for more information.
- Main account. On this form, you can set the sales tax options for specific general ledger account as needed. See Setting Sales Tax Options for a Main Account on the Dynamics AX Main Accounts Form on page 28 for more information.
- Fixed assets. On this form, you can set the sales tax options for specific fixed assets accounts as needed. See Setting Sales Tax Options for a Fixed Asset on the Dynamics AX Fixed Assets Form on page 28 for more information.
- Value model. On this form, you can set the sales tax options for specific value model accounts as needed. See Setting Sales Tax Options for a Value Model on the Dynamics AX Value Model Form on page 28 for more information.
- Charges Code. On this form, you can set the sales tax options for specific charges as needed. See Setting Sales Tax Options for a Miscellaneous Charge Code on the Dynamics AX Charges Code Form on page 27 for more information.
- Mode of delivery. You can select sales tax options for each mode of delivery that is available in Microsoft Dynamics AX. See Setting Options on the Dynamics AX Mode of Delivery Form on page 29 for more information.
- Terms of delivery. Use this form to designate the freight on board option for each delivery term. See Setting Options on the Dynamics AX Delivery Terms Forms on page 29 for more information.
- Units. On this form, you can set the unit type code options for specific units as needed. See Setting Options on the Dynamics AX Unit Form on page 29 for more information.
Basic Setup of the Sales Component
The options you select when you perform the following procedure will be the defaults for all sales, unless overridden at the order header or line item level.
To set up the sales component, do the following:
- Select the CCH menu in the Microsoft Dynamics AX Navigation Pane.
- In the Forms pane, select SureTax > Sales, and then open the SureTax Sales Setup form.
- Select options for the following fields in the General section:
- Update order lines. Select an option to indicate whether changes made to CCH SureTax settings at the order level should flow to the line item level.
- Update misc. charges. Select an option to indicate whether you want changes made to CCH SureTax Sales settings at the order header or line item level to automatically flow to the corresponding miscellaneous charges.
- Select options for the following fields in the CCH SureTax defaults section:
- Default Exempt Code. Select default tax exemption code. This value defaults into the order-header settings but can be overridden on the AX Customers form.
- Default Regulatory Code. Select a default regulatory code from the list. The option you select here will default for order-header settings, but can be overridden on the AX Customers form. The options listed here vary depending on which data packages have been purchased with the main CCH SureTax application.
- Default Sales Type. Select a default sales type from the list. The option you select here will default for order-header settings, but can be overridden on the AX Customers form.
- Default Situs Rule. Select a default situs rule from the list. The option you select here will default for order-header settings, but can be overridden on the AX Released Products, Category Hierarchy, Main Account, Value Model, Fixed Asset, or Charges form.
- Default Transaction Type. Select a default transaction type from the list. The option you select here will default for order-header settings, but can be overridden on the AX Released Products, Category Hierarchy, Main Account, Value Model, Fixed Asset, or Charges form.
- Default Unit Type. Select a default unit type from the list. The option you select here will default for order-header settings, but can be overridden on the AX Units form.
- Select options for the following fields in the Stocking unit preferences section:
- Transaction type option. Select an option to indicate whether Stocking Keeping Unit or Transaction type code field will be sent as the SKU to CCH SureTax.
- Sales order field. Select an option to indicate which field will be sent as the SKU to CCH SureTax in a case where both Item ID and Sales Category exist on an order line.
- Free text invoice field. Select the name of the field from the Dynamics AX Free Text Invoice form that should be used as the stocking unit.
- Select options for the field in the Free Text Invoice field:
- Update order lines. Select an option to indicate whether changes made to CCH SureTax settings at the order level should flow to the line item level.
- Select the options in the Sales order section. The fields in this section are as follows:
- Append inventory dimension. Select this box to append an inventory dimension to the item ID as the stocking unit on sales orders.
- Inventory dimension. If you selected to append an inventory dimension to the item ID, select the dimension to append to the stocking unit on sales orders.
- Separator. If you selected to append an inventory dimension to the item ID, select a separator to use between the ID and the inventory dimension.
- Select the Default enable tab and select the following, as applicable:
- Sales quotation enable. Select this option if you want CCH SureTax to calculate sales tax on the Sales quotation form. Clear this option if you do not want CCH SureTax to calculate the sales tax on the Sales quotation form.
- Free text invoice enable. Select this option if you want CCH SureTax to calculate sales tax on the Free text invoice form. Clear this option if you do not want CCH SureTax to calculate the sales tax on the Free text invoice form.
- Sales order enable. Select this option if you want CCH SureTax to calculate sales tax on the Sales order form. Clear this option if you do not want CCH SureTax to calculate the sales tax on the Sales order form.
- Invoice proposal enable. Select this option if you want CCH SureTax to calculate sales tax on the Invoice proposal form. Clear this option if you do not want CCH SureTax to calculate the sales tax on the Invoice proposal form.
- Do the following in the Default ship-from address tab:
- Select the Customer's warehouse box if the default ship-from address should be the customer's warehouse.
- Enter an address in the Default ship-from address section. This address will be used when no customer warehouse address is available.
- Close the form to save your changes.
Setting CCH SureTax Options on the Microsoft Dynamics AX Forms
When you install CCH SureTax for Microsoft Dynamics AX, the plug-in adds sales tax settings to several standard forms in Microsoft Dynamics AX. The table below lists Accounts Receivable forms that receive additional settings from the plug-in. It also shows where these settings affect the sales tax calculation.
| Microsoft Dynamics AX Form | Microsoft Dynamics AX Module | CCH SureTax Fields Added to the Microsoft Dynamics AX Form | Transactions Affected by CCH SureTax Settings |
|---|---|---|---|
| Customers | Accounts Receivable | Sales quotation enable, Sales order enable, Free text invoice enable, Invoice proposal enable, Sales Type code, Tax exemption code, Default Transaction Type, Default Situs Rule | Sales orders, Sales quotations, Free text invoices, Invoice proposal |
| Released Products | Product information management | Transaction type code, Default Situs Rule | Sales orders, Sales quotations |
| Category Hierarchy | Sales and Marketing | Transaction type code, Default Situs Rule | Sales orders, Sales quotations |
| Main Account | General ledger | Default Situs Rule, Transaction type code | Free text invoice |
| Fixed Asset | Fixed Assets | Default Situs Rule, Transaction type code | Free text invoice |
| Value Model | Fixed Assets | Default Situs Rule, Transaction type code | Free text invoice |
| Charges code | Accounts Receivable | Default Situs Rule, Transaction type code | Charges Transactions |
| Units | Organization administration | Unit type code | Sales orders, Sales quotations |
| Terms of delivery | Sales and Marketing | Freight on board | Sales quotations, Free text invoices, Sales orders |
| Modes of delivery | Sales and Marketing | Delivery by | Sales quotations, Free text invoices, Sales orders |
The procedures that follow contain instructions for setting configuration options on the Dynamics AX forms listed in the preceding table.
Setting CCH SureTax Options for a Customer on the Dynamics AX Customer Form
Use the following procedure to choose the CCH SureTax options for specific Dynamics AX customer accounts. The CCH SureTax options that can be modified for a customer are the Sales quotation enable, Sales order enable, Free text invoice enable, Invoice proposal enable, Sales Type code, Tax exemption code, Default Transaction Type, and Default Situs Rule.
- Select the Accounts Receivable menu in the Microsoft Dynamics AX Navigation Pane.
- Navigate to the Customer Details form for any customer.
- Click the CCH SureTax fast tab.
- In the SureTax section, select the following options. If any of these options are left blank, the default is used:
- Sales quotation enable. Your selection will default onto the SureTax Sales Setup form for this customer.
- Sales order enable. Your selection will default onto the SureTax Sales Setup form for this customer.
- Free text invoice enable. Your selection will default onto the SureTax Sales Setup form for this customer.
- Invoice proposal enable. Your selection will default onto the SureTax Sales Setup form for this customer.
- Sales Type code. Your selection will override the default Sales type selected on the SureTax Sales Setup form for this customer.
- Tax exemption code. Your selection will override the default Tax exemption code selected on the SureTax Sales Setup form for this customer.
- Transaction Type. Your selection will override the default Transaction type selected on the SureTax Sales Setup form for this customer.
- Tax Situs Rule. Your selection will override the default Tax Situs Rule selected on the SureTax Sales Setup form for this customer.
- Close the form to save your changes.
Setting Sales Tax Options for a Product on the Dynamics AX Released Products Form
Use the following procedure to override the CCH SureTax options for specific Dynamics AX Released Products. The CCH SureTax options that can be modified for Released Products are the Transaction Type and the Tax Situs Rule.
- Select the Product information management menu in the Microsoft Dynamics AX Navigation Pane.
- Navigate to Common > Released products.
- Select an item and click Edit on the action pane.
- On the Released products form, expand the CCH SureTax tab and select the following options:
- Transaction Type. Your selection will override the transaction type selected on the transaction forms. If left blank, the header level selection defaults for Released Product on transactions.
- Tax Situs Rule. Your selection will override the default Tax Situs Rule selected on the transaction forms. If left blank, the header level selection defaults for Released Products on transactions.
- Close the form to save your changes.
Setting Sales Tax Options for Sales Category on the Dynamics AX Category Hierarchy Form
Use the following procedure to override the CCH SureTax options for specific Dynamics AX Sales Category. The CCH SureTax options that can be modified for Sales Category are the Transaction Type and the Tax Situs Rule.
- Select the Sales and Marketing menu in the Microsoft Dynamics AX Navigation Pane.
- Navigate to Setup > Categories > Sales categories.
- On the Sales Categories form, click Edit category hierarchy.
- On the Category hierarchy form, expand the CCH SureTax tab and select the following options:
- Tax Situs Rule. Your selection will override the default Tax Situs Rule selected on the transaction forms. If left blank, the header level selection defaults for sales category on transactions.
- Transaction Type. Your selection will override the transaction type selected on the transaction forms. If left blank, the header level selection defaults for sales category on transactions.
- Close the form to save your changes.
Setting Sales Tax Options for a Miscellaneous Charge Code on the Dynamics AX Charges Code Form
Use the following procedure to override the CCH SureTax options for specific Dynamics AX Charges Codes. The CCH SureTax options that can be modified for Charges Codes are the Transaction Type and the Tax Situs Rule.
- Select the Accounts Receivable menu in the Microsoft Dynamics AX Navigation Pane.
- Navigate to Setup > Charges > Charges code.
- On the Charges code form, expand the CCH SureTax tab and select the following options in the SureTax defaults section:
- Sales quotation enable. Your selection will default on to the SureTax Sales Setup form for this customer. If left blank, the default is used.
- Sales order enable. Your selection will default on to the SureTax Sales Setup form for this customer. If left blank, the default is used.
- Free text invoice enable. Your selection will default on to the SureTax Sales Setup form for this customer. If left blank, the default is used.
- Invoice proposal enable. Your selection will default on to the SureTax Sales Setup form for this customer. If left blank, the default is used.
- Transaction Type. Your selection will override the Transaction type selected on the transaction forms. If left blank, the header level selection defaults for charges on transactions.
- Tax Situs Rule. Your selection will override the default Tax Situs Rule selected on the transaction forms. If left blank, the header level selection defaults for charges on transactions.
- Close the form to save your changes.
Setting Sales Tax Options for a Main Account on the Dynamics AX Main Accounts Form
Use the following procedure to override the CCH SureTax options for specific Dynamics AX Main Account form. The CCH SureTax options that can be modified for Main account are the Transaction Type and the Tax Situs Rule.
- Select the General ledger menu in the Microsoft Dynamics AX Navigation Pane.
- Navigate to Common > Main accounts > Main accounts.
- Select a main account and click Edit on the action pane.
- On the Main account form, expand the CCH SureTax tab and select the following options:
- Transaction Type. Your selection will override the Transaction type selected on the transaction forms. If left blank, the header level selection will default for Main Account on transactions.
- Tax Situs Rule. Your selection will override the default Tax Situs Rule selected on the transaction forms. If left blank, the header level selection will default for Main Account on transactions.
- Close the form to save your changes.
Setting Sales Tax Options for a Fixed Asset on the Dynamics AX Fixed Assets Form
Use the following procedure to override the CCH SureTax options for specific Dynamics AX Fixed Assets. The CCH SureTax options that can be modified for Fixed Asset are the Transaction Type and the Tax Situs Rule.
- Select the Fixed Assets menu in the Microsoft Dynamics AX Navigation Pane.
- Navigate to Common > Fixed Assets > Fixed assets.
- Select a fixed asset and click Edit on the action pane.
- On the Fixed assets form, expand the CCH SureTax tab and select the following options:
- Transaction Type. Your selection will override the Transaction type selected on the transaction forms. If left blank, the header level selection will default for Fixed Assets on transactions.
- Tax Situs Rule. Your selection will override the default Tax Situs Rule selected on the transaction forms. If left blank, the header level selection will default for Fixed Assets on transactions.
- Close the form to save your changes.
Setting Sales Tax Options for a Value Model on the Dynamics AX Value Model Form
Use the following procedure to override the CCH SureTax options for specific Dynamics AX Value Model. The CCH SureTax options that can be modified for Value model are the Transaction Type and the Tax Situs Rule.
- Select the Fixed Assets menu in the Microsoft Dynamics AX Navigation Pane.
- Navigate to Common > Fixed Assets > Fixed assets.
- Select a fixed asset and click Books > Value models on the action
- On the Value models form, select the CCH SureTax tab and select the following options:
- Transaction Type. Your selection will override the Transaction type selected on the transaction forms. If left blank, the header level selection will default for Value Model on transactions.
- Tax Situs Rule. Your selection will override the default Tax Situs Rule selected on the transaction forms. If left blank, the header level selection will default for Value Model on transactions.
- Close the form to save your changes.
Setting Options on the Dynamics AX Mode of Delivery Form
When tax is calculated on an order, the Common carrier option that is associated with the selected mode of delivery is sent to CCH SureTax. Use the following procedure to set the CCH SureTax Common carrier option for each mode of delivery that has been set up in Microsoft Dynamics AX.
- Select the Sales and Marketing menu in the Microsoft Dynamics AX Navigation Pane.
- Navigate to Setup > Distribution > Modes of delivery.
- On the Mode of delivery form, select a delivery mode.
- Expand the CCH SureTax tab on the right-hand pane.
- Select the option in the Common carrier field.
- Close the form to save your changes.
Setting Options on the Dynamics AX Delivery Terms Forms
When tax is calculated on an order, the Freight on board option that is associated with the selected delivery term is sent to CCH SureTax. Use the following procedure to set the CCH SureTax Freight on Board option for each delivery term that has been set up in Microsoft Dynamics AX.
- Select the Sales and Marketing menu in the Microsoft Dynamics AX Navigation Pane.
- Navigate to Setup > Distribution > Terms of delivery.
- On the Terms of delivery form, select a delivery term.
- Expand the CCH SureTax tab on the right-hand pane.
- Select a Freight on board option.
- Close the form to save your changes.
Setting Options on the Dynamics AX Unit Form
When tax is calculated on an order, the CCH SureTax option that is associated with the selected unit type code is sent to CCH SureTax. Use the following procedure to set the CCH SureTax option for each unit that has been set up in Microsoft Dynamics AX.
- Select the Organization administration menu in the Microsoft Dynamics AX Navigation Pane.
- Navigate to Setup > Units > Units.
- On the Unit form, select a unit.
- Expand the CCH SureTax tab on the right-hand pane.
- Select an option for this unit in the Unit type code field. Your selection will override the Unit type code selected on the transaction forms. If left blank, the header level selection will default for Unit on transactions.
- Close the form to save your changes.
Using the Sales Component
Selecting Sales Tax Options for a Sales Order or a Sales Quotation
You can set CCH SureTax options at the sales order or sales quotation level, or you can set sales tax options for individual line items, depending on your needs. Keep in mind the following when you make changes to the options on a sales order or sales quotation:
- Order-level or quotation-level changes override defaults from the SureTax Sales Setup form.
- Order-level or quotation-level changes override any custom selections that were made on the Microsoft Dynamics AX Customer form.
- Line item changes override selections made at all other levels, including order-level or quotation level changes and changes made on the Customer form.
Setting Sales Tax Options at the Sales Order or Sales Quotation Level
By default, new sales orders and quotations will use the sales tax options that are selected in the SureTax Sales Setup form. Use the procedure below to select different options for a specific sales order or sales quotation.
- Select the Accounts Receivable menu in the Microsoft Dynamics AX Navigation pane.
- Navigate to Common > Sales orders > All sales orders.
- Open the Sales Order Details or Sales Quotation Details form.
- Create new or select an existing sales order or quotation for which you want to set sales tax options.
- On the Sales order form, click the SureTax Setup button.
- Select Sales Order. The SureTax Setup form for Sales order form displays.
- Select the following CCH SureTax options for the sales order or quotation:
- Enable. Select this option if you want CCH SureTax to calculate sales tax for this order or quotation. Clear this option if you do not want CCH SureTax to calculate the sales tax.
- Sales type code. Select the Sales type code for the Sales order or quotation.
- Regulatory code. Select the Regulatory code for the Sales order or quotation.
- Tax exemption code. Select the Tax exemption code for the Sales order or quotation.
- Tax situs rule. Select the tax situs rule for the sales order or quotation.
- When a Tax situs rule of 7 is selected, the Primary and Secondary ZIP Code fields will display.
- Primary zip code. Enter the Primary ZIP Code for the sales order or quotation.
- Secondary zip code. Enter the Secondary ZIP Code for the sales order or quotation.
- Transaction type code. Select the Transaction type code for the Sales order or quotation.
- Unit type code. Select the Unit type code for the Sales order or quotation.
- Close the CCH SureTax Setup form to save the changes.
Setting Sales Tax Options at the Line Item Level for a Sales Order or Sales Quotation
By default, new line items on a sales order or quotation will use the sales tax options that are selected on the Released products detail form, Category Hierarchy form, and order header for that order or quotation. You can use the procedure below to set different options for individual line items.
- Select the Accounts Receivable menu in the Microsoft Dynamics AX Navigation pane.
- Navigate to Common > Sales orders > All sales orders.
- Open the Sales Order Details or Sales Quotation Details form.
- Create new or select an existing sales order or quotation for which you want to set sales tax options.
- Select the line item to be edited.
- On the sales order form, click the SureTax Setup button.
- Select Sales order line. The SureTax Setup form for Sales order line displays.
- Select the following CCH SureTax options for the sales order or quotation line:
- Enable. Select this option if you want CCH SureTax to calculate sales tax for this line. Clear this option if you do not want CCH SureTax to calculate the sales tax.
- Sales type code. Select the Sales type code for the Sales order or quotation line.
- Regulatory code. Select the Regulatory code for the Sales order or quotation line.
- Tax exemption code. Select the Tax exemption code for the Sales order or quotation line.
- Tax situs rule. Select the Tax situs rule for the Sales order or quotation line.
- When a Tax situs rule of 7 is selected, the Primary and Secondary ZIP Code fields will display.
- Primary zip code. Enter the Primary ZIP Code for the sales order or quotation line.
- Secondary zip code. Enter the Secondary ZIP Code for the sales order or quotation line.
- Transaction type code. Select the Transaction type code for the Sales order or quotation line.
- Unit type code. Select the Unit type code for the Sales order or quotation line.
- Close the SureTax Setup form to save the changes.
Setting CCH SureTax Options on a Free Text Invoice
You can set CCH SureTax options for a free text invoice at the invoice level or at a line item level. Keep in mind the following when you make changes to the CCH SureTax options on a free text invoice:
- Invoice-level changes override defaults from the SureTax Sales Setup form.
- Invoice-level changes override any custom selections made on the Microsoft Dynamics AX Customer form.
- Line item changes override selections made at all other levels, including invoice-level changes and changes made on the Customer form.
Setting CCH SureTax Options at the Invoice Level
- Navigate to Accounts receivable > Common > Free text invoices > All free text invoices.
- Select the invoice for which you want to set CCH Sure Tax options and click Edit.
- Click the Sure Tax Setup button to display the submenu, and then select Free Text Invoice. The SureTax Setup form for invoices displays.
- Select options for the invoice in the following fields on the General tab:
- Sure Tax Enable. Select this option if you want CCH SureTax to calculate sales tax for this invoice. Clear this option if you do not want CCH SureTax to calculate the sales tax.
- Sales Type Code. Select the sales type code for this invoice.
- Regulatory Code. Select a regulatory code for the invoice.
- Tax Exemption Code. Select the tax exemption code that should be sent to CCH SureTax for this invoice.
- Tax Situs Rule. Select the tax situs rule that should be sent to CCH SureTax for this invoice.
- Primary zip code. Enter the Primary ZIP Code for the miscellaneous charge.
- Secondary zip code. Enter the Secondary ZIP Code for the miscellaneous charge.
- Transaction Type Code. Select the transaction type code that should be sent to CCH SureTax for this invoice.
- Unit Type code. Select the unit type code that should be sent to CCH SureTax for this invoice.
- To change the ship-from address, click the Ship from Address tab, and then enter a new address on for the invoice.
- To change the ship-to address, click the Ship to Address tab, and then enter a new address for the invoice.
- Close the SureTax Setup form to save your changes.
Setting CCH SureTax Options at the Line Item Level for an Invoice
- Navigate to Accounts receivable > Common > Free text invoices > All free text invoices.
- Select the invoice for which you want to set CCH SureTax options and click Edit.
- Select the Invoice lines tab.
- Select or add a line for which you want to change CCH SureTax options.
- Click the Sure Tax Setup button to display the submenu, and then select Free Text Invoice line. The SureTax Setup form displays.
- Select options for the invoice line in the following fields on the General tab:
- SureTax Enable. Select this option if you want CCH SureTax to calculate sales tax for this invoice. Clear this option if you do not want CCH SureTax to calculate the sales tax.
- Sales Type Code. Select the sales type code for this invoice.
- Regulatory Code. Select a regulatory code for the invoice.
- Tax Exemption Code. Select the tax exemption code that should be sent to CCH SureTax for this invoice.
- Tax Situs Rule. Select the tax situs rule that should be sent to CCH SureTax for this invoice.
- Primary zip code. Enter the Primary ZIP Code for this invoice.
- Secondary zip code. Enter the Secondary ZIP Code for this invoice.
- Transaction Type Code. Select the transaction type code that should be sent to CCH SureTax for this invoice.
- Unit Type code. Select the unit type code that should be sent to CCH SureTax for this invoice.
- To change the ship-from address, click the Ship from Address tab, and then enter a new address on for the invoice.
- To change the ship-to address, click the Ship to Address tab, and then enter a new address for the invoice.
- Close the SureTax Setup form to save your changes.
Setting Sales Tax Options for Line Items with Tax Situs Rule 7 - Point to Point ZIP Codes (Private Line Transactions) with both A and Z Endpoints Calculated
When a tax situs rule of 7 is selected, the Primary and Secondary ZIP Code fields will display. Additionally, a second line with the same item must be entered, and the amount of the item must be manually divided among the two line items.
- For the first line item of the Point 2 Point Tax Situs Rule set, enter the following information:
- Primary zip code. Enter the Primary ZIP Code for the sales order or quotation line.
- Secondary zip code. Enter the Secondary ZIP Code for the sales order or quotation line.
- Manually set the amount for the line as half of the total amount of the item.
- For the second line item of the Point 2 Point Tax Situs Rule set, reverse the primary zip code and secondary ZIP Code entries from the first line item of the Point to Point Tax Situs Rule set:
- Primary zip code. Enter the Primary ZIP Code for the sales order or quotation line (this should be same as the Secondary zip code entry from the first line item).
- Secondary zip code. Enter the Secondary ZIP Code for the sales order or quotation line (this should be same as the Primary zip code entry from the first line item).
- Manually set the amount for the line as half of the total amount of the item.
Setting Sales Tax Options for Miscellaneous Charges
You can set sales tax options for miscellaneous charges on sales orders, sales quotations, or free text invoices. Options can be set at the order header level or at the line item level, depending on your needs.
To set sales tax options for a miscellaneous charge, do the following:
- Open the Sales Order Details, Sales Quotation Details, or Free Text Invoice Details form.
- Select a sales order, sales quotation, or invoice for which you want to set up the miscellaneous charges sales tax option.
- Add either a header level miscellaneous charge or a line level miscellaneous charge to display the Misc. charges transactions form.
- Select the miscellaneous charge code for which you are setting up sales tax options.
- Click SureTax Setup. The SureTax Setup form for charges code displays.
- Select or clear the following options on the SureTax Setup form as needed for this miscellaneous charge:
- Enable. Select this option if you want CCH SureTax to calculate sales tax for this miscellaneous charge.
- Sales type code. Select the sales type code for the miscellaneous charge.
- Regulatory code. Select the regulatory code for the miscellaneous charge.
- Tax exemption code. Select the tax exemption code for the miscellaneous charge.
- Tax situs rule. Select the tax situs rule for the miscellaneous charge.
- When a Tax situs rule of 7 is selected, the Primary and Secondary ZIP Code fields will display.
- Primary zip code. Enter the Primary ZIP Code for the miscellaneous charge.
- Secondary zip code. Enter the Secondary ZIP Code for the miscellaneous charge.
- Transaction type code. Select the transaction type code for the miscellaneous charge.
- Unit type code. Select the unit type code for the miscellaneous charge.
- Close the SureTax Setup form to save your changes.
Calculating and Viewing Sales Tax Details
The method for calculating sales tax on sales orders and sales quotations, and free text invoices is basically the same. After you select to calculate the tax, information about the taxes is displayed on the Temporary sales tax transaction form. You can calculate and view information for the entire transaction (sales order, sales quotation, or free text invoice) and for each individual line item on any of these forms.
To calculate and view sales tax details on a Sales Quotation, do the following:
- Create new or select the sales quotation for which you want to calculate sales tax.
- Confirm that applicable line items have been added and the CCH SureTax settings have been configured for each line item, including the Enable field.
- Click Sales Tax under the Sell tab. The Temporary sales tax transactions form opens, showing the applicable taxes and tax codes for the transaction.
- To view detailed tax calculation information, click the SureTax Tax Details button. The SureTax Tax Display form opens. This form shows tax information sent to and returned from CCH SureTax at an order, line, and detail level. The information on this form cannot be edited.
- Do the following as needed to view tax details for a specific item:
- To view details for a specific line item, select an entry in the Line Items grid. Information about that line item displays in the fields to the right of the grid. Also, a list of the specific taxes that were applied for the line item displays in the Tax Details grid at the bottom of the window.
- To view details for a specific tax, select an item in the Tax Details grid. The specific information for that tax displays in the fields to the right of the grid.
To calculate and view sales tax details on a Sales Order, do the following:
- Create new or select the sales order for which you want to calculate sales tax.
- Confirm that applicable line items have been added and the CCH SureTax settings have been configured for each line item, including the Enable field.
- Click Sales Tax under the Sell tab. The Temporary sales tax transactions form opens, showing the applicable taxes and tax codes for the transaction.
- To view detailed tax calculation information, click the SureTax Tax Details button. The SureTax Tax Display form opens. This form shows tax information sent to and returned from CCH SureTax at an order, line, and detail level. The information on this form cannot be edited.
- Do the following as needed to view tax details for a specific item:
- To view details for a specific line item, select an entry in the Line Items grid. Information about that line item displays in the fields to the right of the grid. Also, a list of the specific taxes that were applied for the line item displays in the Tax Details grid at the bottom of the window.
- To view details for a specific tax, select an item in the Tax Details grid. The specific information for that tax displays in the fields to the right of the grid.
To calculate and view sales tax details on a Free Text Invoice, do the following:
- Create new or select the free text invoice for which you want to calculate sales tax.
- Confirm that applicable line items have been added and the CCH SureTax settings have been configured for each line item, including the Enable field.
- Click Sales Tax in the Details section. The Temporary sales tax transactions form opens, showing the applicable taxes and tax codes for the transaction.
- To view detailed tax calculation information, click the SureTax Tax Details button. The SureTax Tax Display form opens. This form shows tax information sent to and returned from CCH SureTax at an order, line, and detail level. The information on this form cannot be edited.
- Do the following as needed to view tax details for a specific item:
- To view details for a specific line item, select an entry in the Line Items grid. Information about that line item displays in the fields to the right of the grid. Also, a list of the specific taxes that were applied for the line item displays in the Tax Details grid at the bottom of the window.
- To view details for a specific tax, select an item in the Tax Details grid. The specific information for that tax displays in the fields to the right of the grid.
Finalizing a Sales Order or Free Text Invoice
When you post a sales order or free text invoice, CCH SureTax calculates the sales tax and records the final amounts for compliance purposes, and taxes are posted to respective ledger accounts.
To view taxes on a finalized Sales order, do the following:
- Open the completed Sales order.
- In the Generate section, under the Sell tab, select Confirm sales order. The Confirm Sales order form displays.
- To see taxes on the printed confirmation, select Print confirmation. Taxes will display on the printed confirmation.
- In the Generate section under the Invoice tab, select Invoice.
- To see taxes on the printed invoice, select Print. Taxes will display on the printed invoice.
- To view posted sales tax, click the Invoice journal button. The Invoice journal form displays.
- Select Posted sales tax. The Posted sales tax form displays, showing the posted sales tax for the selected invoice.
- Click the Voucher button. The Voucher transactions form displays, showing taxes along with the corresponding ledger entries.
To finalize a Free text invoice, do the following:
- Open the completed free text invoice.
- Click the Select Post button.
- To view taxes on a printed invoice, select Print. The taxes will display on the printed invoice.
- To view posted sales tax, click the Invoice journal button in the Related information section. The Invoice journal form displays.
- Select Posted sales tax. The Posted sales tax form displays, showing the posted sales tax for the selected invoice.
- Click the Voucher button. The Voucher transactions form displays showing taxes along with the corresponding ledger entries.
Chapter 3 - Configuring and Using the Purchasing Component
Overview
The Purchasing component of the CCH SureTax for Microsoft Dynamics® AX plug-in integrates with the Dynamics AX Accounts Payable module. It provides tools for managing sales tax compliance for purchases your company makes.
The first half of this chapter includes some introductory information regarding consumer use tax and sales tax, followed by instructions for configuring the Purchasing component. The setup process includes selecting options in the CCH SureTax plug-in, as well as setting defaults on some standard Dynamics AX forms.
The second half of the chapter, titled Using the Purchasing Component, includes information about using CCH SureTax options when entering transactions into Microsoft Dynamics AX.
Basic Setup of the Purchasing Component
The options you select when you configure the Purchasing Component will be the defaults for all accounts payable transactions. The default settings can be overridden at the vendor, ledger account, order header, and line item levels.
To set up the purchasing component, do the following:
- Select the CCH menu in the Microsoft Dynamics AX Navigation Pane.
- In the Forms pane, expand CCH SureTax > Purchasing, and then select CCH SureTax Purchasing Setup. The CCH SureTax Purchasing Setup form displays.
- On the General tab, select options for each of the following:
- Update order lines. The option selected here indicates whether changes made to CCH SureTax settings at the order header level automatically flow to the line item level.
- Update misc. charges. The option selected here indicates whether changes made to CCH SureTax settings at the order header or line item level automatically flow to the corresponding miscellaneous charges.
- Journal account selection. The option selected here indicates whether the CCH SureTax options for journal transactions should use the defaults selected from the account or for the offset account.
- Tax exemption code. Select the general default Tax exemption code.
- Regulatory Code. Select the general default Regulatory code.
- Sales Type code. Select the general default Sales type code.
- Tax Situs rule. Select the general default tax situs rule.
- Transaction type code. Select the general default transaction type code.
- Unit type code. Select the general default unit type code.
- On the Default enable tab, select options for each of the following:
- Purchase requisition enable
- Purchase order enable
- Vendor invoice enable
- Invoice register enable
- Invoice Journal enable
- Expense journal enable
- On the Purchase forms line setting tab, select the Ship to options, SKU Table, SKU Field, and Transaction type option for the lines on each purchase form:
- Purchase Order
- Purchase line misc. charge
- Purchase order line item
- Purchase order misc. charge
- Vendor Invoice
- Vendor Invoice line
- Vendor Invoice line misc. charge
- Vendor Invoice misc. charge
- Invoice Journal
- Invoice Journal line
- Expense Journal
- Expense Journal line
- Invoice Register
- Invoice Register line
- Purchase Requisition
- Purchase requisition line item
- Purchase requisition line misc. charge
- Purchase Order
- On the Ship From Address tab, enter the default ship from address to be sent to CCH SureTax for Purchase transactions. This address will be used when no ship from address is available.
- On the Ship to Address tab, enter the default ship to address to be sent to CCH SureTax for Purchase transactions. This address will be used when no ship to address is available.
- Close the CCH SureTax Purchasing Setup form to save the settings for the Purchasing component.
Setting CCH SureTax Options for Vendors and Accounts
When you install CCH SureTax for Microsoft Dynamics AX, the plug-in adds sales tax options to the Microsoft Dynamics AX Main accounts, Customer, Vendor, Project, Fixed Assets and Bank forms. These options allow you to select CCH SureTax settings specific for individual vendors and accounts. Setting CCH SureTax options for individual vendors and accounts is optional. As the vendor or account is added to transaction form, the CCH SureTax settings for the account will default onto the form.
Setting CCH SureTax Options for a Vendor
To select CCH SureTax settings for a particular vendor, do the following:
- Navigate to any vendor's Vendor form.
- Click the CCH Sure Tax tab.
- In the Order defaults section, select the following options for this vendor:
- Vendor invoice enable. Select whether CCH SureTax should calculate sales tax on Vendor invoice for this vendor.
- Invoice register enable. Select whether CCH SureTax should calculate sales tax on Invoice Register for this vendor.
- Sales type code. Select the default sales type code to be used for this vendor.
- Tax Exemption code. Select the default tax exemption code to be used for this vendor.
- Tax situs rule code. Select the default tax situs rule to be used for this vendor.
- Transaction type code. Select the default transaction type code to be used for this vendor.
- Close the form to save the CCH SureTax settings for the vendor.
Setting CCH SureTax Options for a General Ledger Account
To select CCH SureTax settings for a General ledger account, do the following:
- Navigate to any Main account form.
- Click the CCH SureTax tab.
- In the Order defaults section, select the following options for this General ledger account:
- Tax situs rule code. Select the default tax situs rule to be used for this General ledger account.
- Tax Exemption code. Select the default tax exemption code to be used for this General ledger account.
- Close the form to save the CCH SureTax settings for the General ledger account.
Setting CCH SureTax Options for a Project
To select CCH SureTax settings for a Project, do the following:
- Navigate to any Projects form.
- Click the CCH Sure Tax tab.
- In the Invoice journal/register defaults section, select the following options for this Project:
- Tax situs rule code. Select the default tax situs rule to be used for this Project.
- Transaction type code. Select the default tax exemption code to be used for this Project.
- Close the form to save the CCH SureTax settings for the Project.
Setting CCH SureTax Options for a Customer
To select CCH SureTax settings for a Customer, do the following:
- Navigate to any Customer form.
- Click the CCH Sure Tax tab.
- In the Accounts payable defaults section, select the following options for this Customer:
- Tax situs rule code. Select the default tax situs rule to be used for this Customer.
- Transaction type code. Select the default tax exemption code to be used for this Customer.
- Close the form to save the CCH SureTax settings for the Customer.
Setting CCH SureTax Options for a Bank
To select CCH SureTax settings for a Bank, do the following:
- Navigate to any Bank form.
- Click the CCH SureTax tab.
- In the Order defaults section, select the following options for this Bank:
- Tax situs rule code. Select the default tax situs rule to be used for this Bank.
- Transaction type code. Select the default tax exemption code to be used for this Bank.
- Close the form to save the CCH SureTax settings for the Bank.
Setting CCH SureTax Options for a Fixed Asset
To select CCH SureTax settings for a Fixed Asset, do the following:
- Navigate to any Fixed Asset form.
- Click the CCH Sure Tax tab.
- In the Order defaults section, select the following options for this Fixed Asset:
- Tax situs rule code. Select default tax situs rule to be used for this Fixed Asset.
- Transaction type code. Select default tax exemption code to be used for this Fixed Asset.
- Close the form to save the CCH SureTax settings for the Fixed Asset.
Setting Options on the Dynamics AX Unit Form
When tax is calculated on an order, the CCH SureTax option that is associated with the selected unit type code is sent to CCH SureTax. Use the following procedure to set the CCH SureTax option for each unit that has been set up in Microsoft Dynamics AX.
- Select the Organization administration menu in the Microsoft Dynamics AX Navigation Pane.
- Navigate to Setup > Units > Units.
- On the Unit form, select a unit.
- Expand the CCH SureTax tab on the right-hand pane.
- Select an option for this unit in the Unit type code field. Your selection will override the Unit type code selected on the transaction forms. If left blank, the header level selection will default for Unit on transactions.
- Close the form to save your changes.
Setting Sales Tax Options for a Miscellaneous Charge Code
To select CCH SureTax options for specific Dynamics AX Charges Codes in Accounts Payable, do the following:
- Select the Accounts Payable menu in the Microsoft Dynamics AX Navigation Pane.
- Navigate to Setup > Charges > Charges code.
- Select CCH SureTax Setup.
- In the Order defaults section, select the following options for this Fixed Asset:
- Tax situs rule code. Select the default tax situs rule to be used for this Fixed Asset.
- Transaction type code. Select the default tax exemption code to be used for this Fixed Asset.
- Purchase requisition enable. Select whether CCH SureTax should calculate sales tax on Purchase requisition for this Charges code.
- Purchase order enable. Select whether CCH SureTax should calculate sales tax on Purchase order for this Charges code.
- Vendor invoice enable. Select whether CCH SureTax should calculate sales tax on Vendor invoice for this Charges code.
- Close the form to save your changes.
Using the Purchasing Component
You can override the options selected for CCH SureTax at the order and line item level on Account Payable transaction forms. This capability is available for the following:
- Purchase Requisition
- Purchase order
- Vendor Invoice
- Invoice journal
- Invoice register
- Expense Journal (Projects Module)
- Miscellaneous charges
The following sections explain how to modify the CCH SureTax settings for these forms.
Setting CCH SureTax Options on a Purchase Requisition or Purchase Order
CCH SureTax settings on a purchase requisition or purchase order will default from the Purchase Setup form at the header level. Line level settings and Header Miscellaneous charges will default from the Header level settings. Line level Miscellaneous charges will default from the header level miscellaneous charges.
The defaults selections for the Tax situs rule and Transaction type code at the line level are overridden by CCH SureTax settings on the Released products details form. If CCH SureTax settings are not configured on the Released products details form, these settings will come from the header level settings.
The default selection for the Unit type code at the line level is overridden by CCH SureTax settings on the Units form. If CCH SureTax setting is not configured on the Units form, this setting will come from the header level settings.
The default Tax situs rule and Transaction type code settings for miscellaneous charges are overridden by selections on the Charges Code form. If CCH SureTax settings are not configured on the Charges code form, these settings will come from the header level settings.
Note: Header level miscellaneous charges apply only to Purchase Order.
To select CCH SureTax options at the Purchase Requisition or Purchase Order level, do the following:
- Create a new sales order or quotation, or select an existing sales order or quotation for which you want to set CCH SureTax options.
- In the Purchase requisition action pane, click SureTax Setup.
- Select Purchase Requisition. The SureTax Setup form for Purchase requisition displays.
- Select the following CCH SureTax options for the Purchase requisition.
- Enable. Select this option if you do not want CCH SureTax to calculate sales tax for this purchase requisition.
- Calculate sales tax or calculate use tax. Select whether to calculate sales tax or calculate use tax.
- Sales type code. Select the sales type code for the purchase requisition.
- Regulatory code. Select the Regulatory code for the purchase requisition.
- Tax exemption code. Select the tax exemption code for the purchase requisition.
- Tax situs rule. Select the tax situs rule for the purchase requisition.
- When a Tax situs rule of 7 is selected, the Primary and Secondary ZIP Code fields display.
- Primary zip code. Enter the Primary ZIP Code for the purchase requisition.
- Secondary zip code. Enter the Secondary ZIP Code for the purchase requisition.
- Transaction type code. Select the transaction type code for the purchase requisition.
- Unit type code. Select the Unit type code for the purchase requisition.
To select CCH SureTax options at the Purchase Requisition or Purchase Order line level, do the following:
- Create a new purchase requisition or purchase order, or select an existing purchase requisition or purchase order for which you want to set CCH SureTax options.
- Select the desired line for which you want to set CCH SureTax options.
- In the action pane, click the SureTax Setup button.
- Select Purchase Requisition or Purchase Order. The SureTax Setup form for the selected Purchase requisition or Purchase order line displays.
- Select the following CCH SureTax options for the line:
- Enable. Select this option if you do not want SureTax to calculate sales tax for this line.
- Calculate sales tax or calculate use tax. Select whether to calculate sales tax or calculate use tax.
- Sales type code. Select the sales type code for the line.
- Regulatory code. Select the Regulatory code for the line.
- Tax exemption code. Select the tax exemption code for the line.
- Tax situs rule. Select the tax situs rule for the line.
- When a Tax situs rule of 7 is selected, the Primary and Secondary ZIP Code fields display.
- Primary zip code. Enter the Primary ZIP Code for the line.
- Secondary zip code. Enter the Secondary ZIP Code for the line.
- Transaction type code. Select the transaction type code for the line.
- Unit type code. Select the Unit type code for the line.
Setting CCH SureTax options on a Vendor Invoice
By default, CCH SureTax settings on a Vendor Invoice default from the SureTax Purchase setup form. These defaults are overridden at the header level by setting from the vendor form. At the line level, CCH SureTax settings from the header level. Header level defaults are overridden by setting from the Item form. Miscellaneous charges on a vendor invoice also default from the Vendor Invoice header level settings. Header level defaults are overridden at the miscellaneous charges level by CCH SureTax settings from the Charges code form.
To select CCH SureTax options at the Vendor Invoice level, do the following:
- Create a new vendor invoice, or select an existing vendor invoice for which you want to set SureTax options.
- In the Vendor invoice action pane, select Vendor invoice. The SureTax Setup form for vendor invoice displays.
- Select the following CCH SureTax options for the vendor invoice.
- Enable. Select this option if you do not want SureTax to calculate sales tax for this vendor invoice.
- Sales type code. Select the sales type code for the vendor invoice.
- Regulatory code. Select the Regulatory code for the vendor invoice.
- Tax exemption code. Select the tax exemption code for the vendor invoice.
- Tax situs rule. Select the tax situs rule for the vendor invoice.
- When a Tax situs rule of 7 is selected, the Primary and Secondary ZIP Code fields display.
- Primary zip code. Enter the Primary ZIP Code for the vendor invoice.
- Secondary zip code. Enter the Secondary ZIP Code for the vendor invoice.
- Transaction type code. Select the transaction type code for the vendor invoice.
- Unit type code. Select the Unit type code for the vendor invoice.
To select CCH SureTax options at the Vendor Invoice line level, do the following:
- Create a new vendor invoice, or select an existing vendor invoice for which you want to set SureTax options.
- Select the desired line for which you want to set SureTax options.
- In the Vendor invoice action pane, select the Vendor invoice line. The SureTax Setup form for vendor invoice displays.
- Select the following CCH SureTax options for the vendor invoice.
- Enable. Select this option if you do not want SureTax to calculate sales tax for this vendor invoice.
- Sales type code. Select the sales type code for the vendor invoice.
- Regulatory code. Select the Regulatory code for the vendor invoice.
- Tax exemption code. Select the tax exemption code for the vendor invoice.
- Tax situs rule. Select the tax situs rule for the vendor invoice.
- When a Tax situs rule of 7 is selected, the Primary and Secondary ZIP Code fields display.
- Primary zip code. Enter the Primary ZIP Code for the vendor invoice.
- Secondary zip code. Enter the Secondary ZIP Code for the vendor invoice.
- Transaction type code. Select the transaction type code for the vendor invoice.
- Unit type code. Select the Unit type code for the vendor invoice.
Setting CCH SureTax options on an Invoice Journal
By default, CCH SureTax settings on an Invoice Journal default from the SureTax Purchase setup form. These defaults are overridden by settings from the selected account form (Ledger, Customer, Vendor, Project, Fixed Asset, Bank) for the Tax situs rule and transaction type code.
To select CCH SureTax options at the Invoice Journal level, do the following:
- Create a new invoice journal, or select an existing invoice journal for which you want to set SureTax options.
- In the Invoice journal action pane, select Invoice journal. The SureTax Setup form for invoice journal displays.
- Select the following CCH SureTax options for the invoice journal:
- Enable. Select this option if you do not want SureTax to calculate sales tax for this invoice journal.
- Sales type code. Select the sales type code for the invoice journal.
- Regulatory code. Select the Regulatory code for the invoice journal.
- Tax exemption code. Select the tax exemption code for the invoice journal.
- Tax situs rule. Select the tax situs rule for the invoice journal.
- When a Tax situs rule of 7 is selected, the Primary and Secondary ZIP Code fields display.
- Primary zip code. Enter the Primary ZIP Code for the invoice journal.
- Secondary zip code. Enter the Secondary ZIP Code for the invoice journal.
- Transaction type code. Select the transaction type code for the invoice journal.
- Unit type code. Select the Unit type code for the invoice journal.
To select CCH SureTax options at the Invoice Journal line level, do the following:
- Create a new invoice journal, or select an existing invoice journal for which you want to set SureTax options.
- Select the desired line for which you want to set SureTax options.
- In the Invoice journal action pane, select the Invoice journal line. The SureTax Setup form for invoice journal displays.
- Select the following CCH SureTax options for the invoice journal line:
- Enable. Select this option if you do not want SureTax to calculate sales tax for this invoice journal line.
- Sales type code. Select the sales type code for the invoice journal line.
- Regulatory code. Select the Regulatory code for the invoice journal line.
- Tax exemption code. Select the tax exemption code for the invoice journal line.
- Tax situs rule. Select the tax situs rule for the invoice journal line.
- When a Tax situs rule of 7 is selected, the Primary and Secondary ZIP Code fields display.
- Primary zip code. Enter the Primary ZIP Code for the invoice journal line.
- Secondary zip code. Enter the Secondary ZIP Code for the invoice journal line.
- Transaction type code. Select the transaction type code for the invoice journal line.
- Unit type code. Select the Unit type code for the invoice journal line.
Setting CCH SureTax options on an Expense Journal
By default, CCH SureTax settings on an Expense Journal default from the SureTax Purchase setup form. These defaults are overridden by settings from the selected account form (Ledger, Customer, Vendor, Project, Fixed Asset, Bank) for the Tax situs rule and transaction type code.
To select CCH SureTax options at the Expense Journal level, do the following:
- Create a new expense journal, or select an existing expense journal for which you want to set SureTax options.
- In the Expense journal action pane, select Expense journal. The SureTax Setup form for expense journal displays.
- Select the following CCH SureTax options for the expense journal:
- Enable. Select this option if you do not want SureTax to calculate sales tax for this expense journal.
- Sales type code. Select the sales type code for the expense journal.
- Regulatory code. Select the Regulatory code for the expense journal.
- Tax exemption code. Select the tax exemption code for the expense journal.
- Tax situs rule. Select the tax situs rule for the expense journal.
- When a Tax situs rule of 7 is selected, the Primary and Secondary ZIP Code fields display.
- Primary zip code. Enter the Primary ZIP Code for the expense journal.
- Secondary zip code. Enter the Secondary ZIP Code for the expense journal.
- Transaction type code. Select the transaction type code for the expense journal.
- Unit type code. Select the Unit type code for the expense journal.
To select CCH SureTax options at the Expense Journal line level, do the following:
- Create a new expense journal, or select an existing expense journal for which you want to set SureTax options.
- Select the desired line for which you want to set SureTax options.
- In the Expense journal action pane, select the Expense journal line. The SureTax Setup form for expense journal displays.
- Select the following CCH SureTax options for the expense journal line:
- Enable. Select this option if you do not want SureTax to calculate sales tax for this expense journal line.
- Sales type code. Select the sales type code for the expense journal line.
- Regulatory code. Select the Regulatory code for the expense journal line.
- Tax exemption code. Select the tax exemption code for the expense journal line.
- Tax situs rule. Select the tax situs rule for the expense journal line.
- When a Tax situs rule of 7 is selected, the Primary and Secondary ZIP Code fields display.
- Primary zip code. Enter the Primary ZIP Code for the expense journal line.
- Secondary zip code. Enter the Secondary ZIP Code for the expense journal line.
- Transaction type code. Select the transaction type code for the expense journal line.
- Unit type code. Select the Unit type code for the expense journal line.
Setting CCH SureTax options on an Invoice Register
By default, CCH SureTax settings on an Invoice Register default from the SureTax Purchase setup form. These defaults are overridden by settings from the selected account form (Ledger, Customer, Vendor, Project, Fixed Asset, Bank) for the Tax situs rule and transaction type code.
To select CCH SureTax options at the Invoice Register level, do the following:
- Create a new invoice register, or select an existing invoice register for which you want to set SureTax options.
- In the Invoice register action pane, select Invoice register. The SureTax Setup form for invoice register displays.
- Select the following CCH SureTax options for the invoice register:
- Enable. Select this option if you do not want SureTax to calculate sales tax for this invoice register.
- Sales type code. Select the sales type code for the invoice register.
- Regulatory code. Select the Regulatory code for the invoice register.
- Tax exemption code. Select the tax exemption code for the invoice register.
- Tax situs rule. Select the tax situs rule for the invoice register.
- When a Tax situs rule of 7 is selected, the Primary and Secondary ZIP Code fields display.
- Primary zip code. Enter the Primary ZIP Code for the invoice register.
- Secondary zip code. Enter the Secondary ZIP Code for the invoice register.
- Transaction type code. Select the transaction type code for the invoice register.
- Unit type code. Select the Unit type code for the invoice register.
To select CCH SureTax options at the Invoice Register line level, do the following:
- Create a new invoice register, or select an existing invoice register for which you want to set SureTax options.
- Select the desired line for which you want to set SureTax options.
- In the Invoice register action pane, select the Invoice register line. The SureTax Setup form for invoice register displays.
- Select the following CCH SureTax options for the invoice register line:
- Enable. Select this option if you do not want SureTax to calculate sales tax for this invoice register line.
- Sales type code. Select the sales type code for the invoice register line.
- Regulatory code. Select the Regulatory code for the invoice register line.
- Tax exemption code. Select the tax exemption code for the invoice register line.
- Tax situs rule. Select the tax situs rule for the invoice register line.
- When a Tax situs rule of 7 is selected, the Primary and Secondary ZIP Code fields display.
- Primary zip code. Enter the Primary ZIP Code for the invoice register line.
- Secondary zip code. Enter the Secondary ZIP Code for the invoice register line.
- Transaction type code. Select the transaction type code for the invoice register line.
- Unit type code. Select the Unit type code for the invoice register line.
Calculating and Viewing Sales Tax Details
The method for calculating sales tax on purchase orders, purchase requisitions, vendor invoices, invoice journals, invoice registers, and expense journals is basically the same. After you select to calculate the tax, information about the taxes is displayed on the Temporary sales tax transaction form. You can calculate and view information for the entire transaction and for each individual line item on any of these forms.
To calculate and view sales tax details on a Purchase Order, do the following:
- Create new or select the purchase order for which you want to calculate sales tax.
- Confirm that applicable line items have been added and the CCH SureTax settings have been configured for each line item, including the Enable field.
- Click Sales Tax under the Purchase tab. The Temporary sales tax transactions form opens, showing the applicable taxes and tax codes for the transaction.
- To view detailed tax calculation information, click the SureTax Tax Details button. The SureTax Tax Display form opens. This form shows tax information sent to and returned from CCH SureTax at an order, line, and detail level. The information on this form cannot be edited.
- Do the following as needed to view tax details for a specific item:
- To view details for a specific line item, select an entry in the Line Items grid. Information about that line item displays in the fields to the right of the grid. Also, a list of the specific taxes that were applied for the line item displays in the Tax Details grid at the bottom of the window.
- To view details for a specific tax, select an item in the Tax Details grid. The specific information for that tax displays in the fields to the right of the grid.
To calculate and view sales tax details on a Vendor Invoice, Invoice Journal, or Invoice Register, do the following:
- Open a Vendor Invoice, Invoice Journal, or Invoice Register.
- Click the Sales Tax button. The Temporary sales tax transactions form displays.
- To view detailed tax calculation information, click the SureTax Tax Details button. The SureTax Tax Display form opens. This form shows tax information sent to and returned from CCH SureTax at an order, line, and detail level. The information on this form cannot be edited.
- Do the following as needed to view tax details for a specific item:
- To view details for a specific line item, select an entry in the Line Items grid. Information about that line item displays in the fields to the right of the grid. Also, a list of the specific taxes that were applied for the line item displays in the Tax Details grid at the bottom of the window.
- To view details for a specific tax, select an item in the Tax Details grid. The specific information for that tax displays in the fields to the right of the grid.
Finalizing a Vendor Invoice, Invoice Journal, and Invoice Register
When you generate an invoice from a Vendor Invoice, Invoice Journal, or Invoice Register, CCH SureTax calculates the sales tax and records the final amounts for compliance purposes. Taxes can be viewed on vouchers and printed documents through normal AX functionality.
Chapter 4 - Configuring and Using the Project Component
Overview
The Project component of the CCH SureTax for Microsoft Dynamics® AX plug-in incorporates elements from the Sales and the Purchasing components of the plug-in. This allows you to accurately calculate sales tax for the sales and expenses that occur as part of a project.
In particular, the Project component includes the ability to set sales tax options and calculate sales tax for the following items in the Microsoft Dynamics AX Project module:
- Project quotations
- Invoice proposal line items
- Expense journals
Configuring the Project Component
The Project component uses the same configuration options that are used by the Sales and Purchasing components. If you have not installed the Sales and Purchasing components, then you will need to perform the configuration tasks that are part of the setup for these two components. Additionally, CCH SureTax settings are added to the Project category form for optional configuration.
Setting CCH SureTax Options for Projects and Project Category
When you install CCH SureTax for Microsoft Dynamics AX, the plug-in adds sales tax options to the Microsoft Dynamics AX Projects and Project category form. These options allow you to select CCH SureTax settings specific for a project and project category. Setting CCH SureTax options for a project or project categories is optional. As lines are added to project transaction forms, the CCH SureTax settings for the project and project categories associated with the line will default onto the form.
Setting CCH SureTax Options for a Project Category
To select CCH SureTax settings for a Project category, do the following:
- Create a new Project category form, or navigate to a Project category form.
- Click the CCH Sure Tax tab.
- Configure the following options for this Project:
- Tax situs rule code. Select default tax situs rule to be used for this Project.
- Tax Exemption code. Select default tax exemption code to be used for this Project.
- Close the form to save the CCH SureTax settings for the Project.
Setting CCH SureTax Options for a Project
To select CCH SureTax settings for a Project, do the following:
- Navigate to any Projects form.
- Click the CCH SureTax tab.
- In the Project quotation defaults section, select the following option for this Project:
- Project quotation enable. Select whether CCH SureTax should calculate tax on Project quotation for this project.
- In the Expense journal defaults section, select the following options for this Project:
- Expense journal enable. Select whether CCH SureTax should calculate tax on Expense journal for this project.
- Sales type code. Select default tax situs rule to be used for this Project.
- Tax Exemption code. Select default tax exemption code to be used for this Project.
- Close the form to save the CCH SureTax settings for the Project.
Using the Project Component for Sales
The Project component of the CCH SureTax plug-in allows you to calculate sales taxes on project quotations and invoice proposals.
Setting CCH SureTax Options on a Project Quotation
By default, project quotations will use the CCH SureTax sales setup selections for the CCH SureTax options at the header level. The Enable option is overridden by the Project Quotation enable option on the Project form. The Tax exemption code and Sales type code options are overridden by selections on the Customer form.
The CCH SureTax settings at the header level default onto the line level settings as lines are added. The line level Tax situs rule and transaction type code settings are overridden by the CCH SureTax settings on the Released Product details form. If CCH SureTax settings are not configured on the Released Product details form, the settings will default from the Sales Category form. If CCH SureTax settings are not configured on the Sales Category form, the settings will default from the Project Category form. If CCH SureTax settings are not configured on the Project Category form, the settings will default from the CCH SureTax Sales Setup form.
To select different options for a specific Project quotation, do the following:
- Create new or select an existing project quotation for which you want to set sales tax options.
- Select the desired line, if you are configuring CCH SureTax settings for a particular line.
- On the Project quotation form, in the action pane, click the Project quotation or Project quotation line SureTax setup button.
- Select the following CCH SureTax options for the Project quotation or Project quotation line:
- Enable. Select this option if you want CCH SureTax to calculate sales tax for this Project quotation. Clear this option if you do not want CCH SureTax to calculate the sales tax.
- Sales type code. Select the Sales type code for the Sales order or quotation.
- Regulatory code. Select the Regulatory code for the Sales order or quotation.
- Tax exemption code. Select the Tax exemption code for the Sales order or quotation.
- Tax situs rule. Select the tax situs rule for the sales order or quotation.
- When a Tax situs rule of 7 is selected, the Primary and Secondary ZIP Code fields will display.
- Primary zip code. Enter the Primary ZIP Code for the sales order or quotation.
- Secondary zip code. Enter the Secondary ZIP Code for the sales order or quotation.
- Transaction type code. Select the Transaction type code for the Sales order or quotation.
- Unit type code. Select the Unit type code for the Sales order or quotation.
- Close the CCH SureTax Setup form to save the changes.
Setting CCH SureTax Options on an Invoice Proposal
When adding lines for Item, Hour, Expense, and Fee, the CCH SureTax settings for those lines are defaulted from the CCH SureTax Sales Setup form. The Enable, Tax exemption code, and Sales type code defaults are overridden by the settings from the Customer form. When adding a line for an item the Tax Situs Rule and Transaction type code defaults are overridden by settings from the Released products details form. If CCH SureTax settings on the Released product details form is not configured, (or the line is for an Hour, Expense, or Fee) defaults will be overridden by settings from the Project Category. The Ship to address will default from the Project or, when applicable, the Service order. The Ship from address will default per the Customer's warehouse configuration on the SureTax sales setup form. If the Customer's warehouse checkbox is checked, the Ship from address will default from the Customer's warehouse delivery address. If the Customer's warehouse checkbox is not checked, the Ship from address will default from the SureTax sales setup default ship from field.
When adding lines from a Sales Order, the CCH SureTax settings of that line as it is on the respective Sales order will be carried over. If the Ship to address is not configured on the Sales order, the Ship to address will default from the Project or, when applicable, the Service order. If the Ship from address is not configured on the Sales order, the Ship from address will default per the Customer's warehouse configuration on the SureTax sales setup form.
To select different options for a specific Invoice proposal, do the following:
- Create new or select an existing Invoice proposal and select the line for which you want to set sales tax options.
- On the Invoice proposal form, in the action pane, click the Invoice proposal SureTax Setup button.
- Select the following CCH SureTax options for the Invoice proposal:
- Enable. Select this option if you want CCH SureTax to calculate sales tax for this Invoice proposal. Clear this option if you do not want CCH SureTax to calculate the sales tax.
- Sales type code. Select the Sales type code for the Invoice proposal.
- Regulatory code. Select the Regulatory code for the Invoice proposal.
- Tax exemption code. Select the Tax exemption code for the Invoice proposal.
- Tax situs rule. Select the tax situs rule for the Invoice proposal.
- When a Tax situs rule of 7 is selected, the Primary and Secondary ZIP Code fields will display.
- Primary zip code. Enter the Primary ZIP Code for the Invoice proposal.
- Secondary zip code. Enter the Secondary ZIP Code for the Invoice proposal.
- Transaction type code. Select the Transaction type code for the Invoice proposal.
- Unit type code. Select the Unit type code for the Invoice proposal.
- Ship From Address. Enter the Ship From Address for the selected line.
- Ship To Address. Enter the Ship To Address for the selected line.
- Close the CCH SureTax Setup form to save the changes.
Calculating and Viewing Sales Tax for Project Quotations and Invoice Proposals
The method for calculating sales tax on project quotations and invoice proposals is basically the same. After you select to calculate the tax, information about the taxes is displayed on the Temporary sales tax transaction form.
- Open a project quotation or invoice proposal.
- Calculate the sales tax, and then open the Temporary sales tax transaction form.
- To view detailed tax calculation information, click the SureTax Tax Details button. The CCH SureTax Tax Display form opens. This form shows tax information sent to and returned from CCH SureTax at an order, line, and detail level.
- Note: The information on this form cannot be edited.
- To view tax details for a specific item, do the following:
- To view details for a specific line item, select an entry in the Line Items grid.
- Information about that line item displays in the fields to the right of the grid. Also, a list of the specific taxes that were applied for the line item displays in the Tax Details grid at the bottom of the window.
- To view details for a specific tax, select an item in the Tax Details grid. The specific information for that tax displays in the fields to the right of the grid.
Finalizing an Invoice Proposal
When you generate an invoice from an invoice proposal, CCH SureTax calculates the sales tax and records the final amounts for compliance purposes. Taxes can be viewed on vouchers and printed documents through normal AX functionality.
Using the Project Component for Project Expenses
The Project component of the CCH SureTax plug-in allows you to calculate sales taxes on expense journal lines.
Note: For best results, we recommend that you complete the Purchasing setup described in Basic Setup of the Purchasing Component on page 37 before attempting to create or edit an expense journal line for a project.
Setting CCH SureTax options on an Expense Journal
By default, CCH SureTax settings on an Expense Journal default from the SureTax Purchase setup form. These defaults are overridden by settings from the Project category for the Tax situs rule and transaction type code. The enable, Sales type code and Tax exemption code SureTax settings are overridden by the settings from the Project form. If the CCH SureTax settings on the Project form are not configured, the enable, Sales type code, and tax exemption code selections will come from the SureTax Purchase setup form. If the CCH SureTax settings on the Project category form are not configured, the Tax situs rule and the Transaction type code will come from the SureTax Purchase setup form.
To select CCH SureTax options on an Expense journal, do the following:
- Create new or select an existing Expense journal for which you want to set CCH SureTax options.
- In the Expense journal action pane, select SureTax Setup. The SureTax Setup form for Expense journal displays.
- Select the following CCH SureTax options for the Expense journal:
- Enable. Select this option if you do not want CCH SureTax to calculate sales tax for this Expense journal.
- Sales type code. Select the sales type code for the Expense journal.
- Regulatory code. Select the Regulatory code for the Expense journal.
- Tax exemption code. Select the tax exemption code for the Expense journal.
- Tax situs rule. Select the tax situs rule for the Expense journal.
- When a Tax situs rule of 7 is selected, the Primary and Secondary ZIP Code fields will display.
- Primary zip code. Enter the Primary ZIP Code for the Expense journal.
- Secondary zip code. Enter the Secondary ZIP Code for the Expense journal.
- Transaction type code. Select the transaction type code for the Expense journal.
- Unit type code. Select the Unit type code for the Expense journal.
Calculating and Viewing Sales Tax Details for Expense Journal Lines
You can view sales tax information for an entire expense journal entry and for individual line items within the journal entry using the following procedure.
- Open an expense journal.
- Click Lines. The Journal voucher form for the selected journal entry displays.
- Select a voucher line, and then click Sales Tax. The Temporary sales tax transaction form displays.
- To view detailed tax calculation information, click CCH SureTax Tax Details. The CCH SureTax Sales Tax Display form opens. This form displays detailed information about the tax calculation that was performed by CCH SureTax.
- Note: The information on this form cannot be edited.
- To view tax details for a specific item, do the following:
- Select an entry in the Line Items grid.
- Information about that line item displays in the fields to the right of the grid. Also, a list of the specific taxes that were applied for the line item displays in the Tax Details grid at the bottom of the window.
- To view details for a specific tax, select an item in the Tax Details grid. The specific information for that tax displays in the fields to the right of the grid.
Posting Taxes for Project Expenses to CCH SureTax
When you post the expense journal, CCH SureTax calculates the sales tax on the finalized purchases and records the final amounts for line items. Taxes can be viewed on vouchers and printed documents through normal AX functionality.
Appendix A - Uninstalling the CCH SureTax Plug-in Components
Disabling the CCH SureTax Configuration Keys
The easiest way to turn off CCH SureTax for Microsoft Dynamics AX functionality is to disable the CCH SureTax configuration keys. There will be three different keys named Accounts Receivable, Accounts Payable, and SureTax (the parent). By disabling Accounts Receivable or Accounts Payable, you remove all related forms and objects unique to those modules. By disabling SureTax, you disable and remove all objects related to the integration.
Note: To disable the SureTax key, you must remove the license code found under System Administration > Setup > Licensing > License information > Partner feature sets.
Warning: All data in CCH SureTax tables is lost from the Dynamics AX database when you disable the configuration keys.
- In the Dynamics AX navigation pane, select System Administration > Setup > Licensing > License Configuration. The Configuration window displays.
- Clear the SureTax configuration key.
- Click Apply.
- Click Yes when the system asks whether you want to synchronize tables.
- Click Continue when the Synchronize database window displays.
- Click OK on the Configuration window to close it.
Uninstalling the CCH SureTax Plug-in
The following pages outline the three steps to uninstall the plug-in:
- Uninstall customizations. Instructions are included in the next section.
- Compile and synchronize. After customizations have been installed from Dynamics AX, the Dynamics AX applications must be compiled and synchronized.
- Uninstall plug-in program files. After customizations have been removed from the system, run the plug-in installation wizard to uninstall the plug-in program files.
Uninstalling Customizations
To fully uninstall the plug-in, the code customizations that were previously installed to the AX model store must be uninstalled. The recommended approach for uninstalling model files is with Windows PowerShell cmdlets. The following instructions give you basic information about using the Uninstall-AXModel PowerShell command to uninstall the plug-in model files. For more information about advanced features of the Uninstall-AXModel PowerShell command or other methods of uninstalling model files, see the Microsoft Dynamics AX documentation.
To uninstall the model files using the Windows PowerShell cmdlets, do the following:
Notes:
- Uninstalling a model file is recommended only if you want to delete it permanently.
- Deleting a model can cause loss of business data. For more information, see the Microsoft Dynamics AX documentation on uninstalling models.
- The following instructions assume Dynamics AX Management Utilities are installed on the machine where customizations will be uninstalled.
- Select Start > Administrative Tools > Microsoft Dynamics AX 2012 Management Shell.
- At the command prompt, remove each plug-in model with the following command:
Uninstall-AXModel -Model <MDL>- Note: Replace
<MDL>with the name of the plug-in model file.
- Note: Replace
- Enter Y and press Enter to confirm that you want to continue deleting the model file.
Compiling and Synchronizing the Dynamics AX Application
After customizations have been uninstalled from Dynamics AX, do the following to compile and synchronize the Dynamics AX application:
- Restart the Dynamics AX AOS.
- Start the Dynamics AX Client.
- Note: When opening the Dynamics AX client, you may be presented with a window stating the model store has been modified and asking whether you would like to launch the model upgrade checklist. Choose Skip. These operations will be manually performed.
- Select System Administration > Periodic > Compile application.
- Click Yes.
- Select System Administration > Periodic > Compile into .NET Framework CIL.
- Click Yes.
- Restart the Dynamics AX AOS.
Uninstalling Plug-In Program Files
To uninstall the plug-in program files, do the following:
- Navigate to Start > Control Panel > Programs > Uninstall a Program.
- Select SureTax for MS Dynamics AX 2012 (Sales) from the list of installed programs.
- Click Uninstall.
- If prompted with a message asking if you are sure you want to uninstall CCH SureTax for MS Dynamics AX, click Yes. The plug-in program files are removed.
Appendix B - Importing the Intelligent Data Management Framework Templates
If you are installing to a server, you will need to import the Intelligent Data Management Framework template files by doing the following:
- Open Intelligent Data Management Framework.
- Select Configure > Import.
- Select the templates to import. The files will be in the folder you specify during installation.
- Click Open.