SureTax Portal SSO Integration
Seamless Single Sign-On between your Customer Portal and SureTax using OpenID Connect (OIDC)
Introduction
This guide describes how to integrate Single Sign-On (SSO) between your Customer Portal and the SureTax Portal using the OpenID Connect (OIDC) protocol. SSO integration enables your users to access SureTax Portal seamlessly using their existing corporate credentials — eliminating the need for separate SureTax logins, reducing credential management overhead, and improving security posture.
With SSO enabled, users authenticate once through your organization's Identity Provider (IdP) and are automatically granted access to the SureTax Portal without a second login prompt. The integration leverages standard OIDC flows, making it compatible with all major identity providers.
Single Sign-On
Users sign in once and access both portals without re-entering credentials.
Centralized Security
Authentication is centralized through your IdP with MFA and session management.
Auto-Provisioning
Optionally create SureTax accounts automatically on first login.
Universal IdP Support
Azure AD, Okta, Ping Identity, Auth0, and any OIDC-compliant provider.
Business Requirement
The business objective is to enable seamless Single Sign-On (SSO) between the Customer Portal and the SureTax Portal using the OpenID Connect protocol. This integration will streamline user authentication, leveraging the client's Identity Provider (IdP) to pass essential user claims, including the email address (user ID).
Key benefits of SSO integration:
- Simplified access — Users sign in once and access both the Customer Portal and SureTax Portal without re-entering credentials.
- Improved security — Authentication is centralized through the customer's IdP, enforcing existing password policies, MFA requirements, and session management rules.
- Reduced administrative overhead — User provisioning and deprovisioning can be managed centrally through the IdP, with optional automatic provisioning in SureTax.
- Compliance — Supports organizational security policies, audit requirements, and regulatory mandates for centralized identity management.
SSO Flow
High-Level Diagram
The following diagram illustrates the high-level SSO authentication flow between the Customer Portal, the Identity Provider (IdP), and the SureTax Portal:
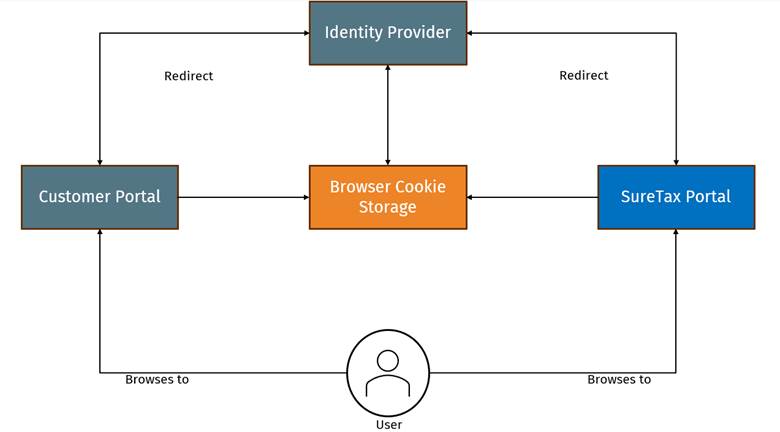
The SSO flow follows the OpenID Connect Authorization Code grant type. The customer's IdP acts as the authentication authority, and the SureTax Portal acts as a relying party (RP) that trusts the IdP to authenticate users and provide identity claims.
Step-by-Step Flow
| Step | Description |
|---|---|
| 1 | User accesses the Customer Portal and initiates login. |
| 2 | Customer Portal redirects the user to the Identity Provider (IdP) for authentication. |
| 3 | User authenticates with the IdP using their credentials (password, MFA, biometrics, etc., as configured by the customer's IdP policy). |
| 4 | IdP generates an authentication token (authorization code) and redirects the user back to the Customer Portal via the Redirect URI. |
| 5 | Customer Portal receives the token and sends a request to the SureTax Portal. |
| 6 | SureTax Portal validates the request with the IdP and retrieves user claims via token exchange. |
| 7 | On successful validation, SureTax Portal grants the user access and establishes a session. |
End-to-End Flow
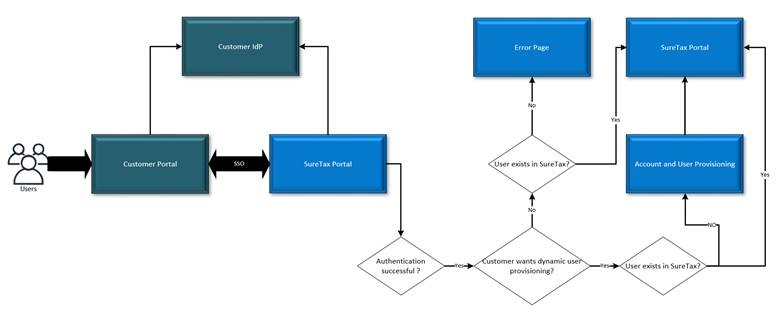
The following diagram shows the detailed end-to-end SSO flow including token exchange and session establishment:
Customer-Side Changes
The customer is responsible for configuring their Identity Provider and their Customer Portal to support the SSO integration with SureTax.
Prerequisites
Before starting the SSO integration, ensure the following:
- Identity Provider (IdP) — Your organization must have an OIDC-compliant Identity Provider (e.g., Azure AD / Entra ID, Okta, Ping Identity, Auth0, or similar).
- Administrative access — You need administrative privileges on your IdP to register new client applications and configure claims.
- SureTax subscription — An active SureTax subscription with SSO capability enabled.
Changes Expected from Customer Side
- Identity Provider Configuration — Configure your IdP to include the SureTax Portal as a trusted application, providing necessary claims and ensuring secure token issuance.
- SSO Testing — Before going live, configure the SureTax SSO URL on your portal and participate in thorough testing to ensure the SSO integration works seamlessly and securely.
Step 1: Information from SureTax
The following information is provided by the SureTax team to the customer. Use these values when configuring the SureTax client application registration in your IdP:
| Information | Value |
|---|---|
| Application Name | SureTax |
| Redirect URI | https://{SureTaxDomain}/SureTax/signin-oidc-{providerid} |
Step 2: Information from Customer
The following information must be provided by the customer to the SureTax team to complete the IdP integration configuration on the SureTax side:
| Information | Description |
|---|---|
| Client ID | A unique identifier assigned to the SureTax Portal client application in the customer's IdP for SSO integration purposes. |
| Client Secret | Client secret of the SureTax Portal client application. |
| IdP Metadata | The configuration details of the IdP, including endpoints for authorization, token, and user info services. Typically provided as a well-known OIDC discovery URL (e.g., https://your-idp.com/.well-known/openid-configuration). |
| User Claims | The claim names used by your IdP for the following attributes (see details below). |
| Grant Type | Authorization Code |
| Auth Provider / Protocol | OIDC (OpenID Connect) |
Required and Optional Claims
The following claims should be configured in your IdP's token issuance policy for the SureTax client application:
| Claim | Required? | Description |
|---|---|---|
| User Email | Required | The user's email address. This serves as the unique user identifier in SureTax. |
| First Name | Conditional | Required if SureTax should automatically create user accounts; otherwise optional. |
| Last Name | Conditional | Required if SureTax should automatically create user accounts; otherwise optional. |
| Account Name | Conditional | Required if SureTax should automatically create accounts; otherwise optional. |
| Org Code | Conditional | Required if SureTax should automatically create accounts; otherwise optional. |
| Notification Email | Optional | If not supplied, the user email will be used for notifications. |
Step 3: How to Integrate
Once SSO configuration is completed on both the customer side and the SureTax side, perform the following steps to activate the integration:
- Add the SureTax SSO URL to the customer portal:
https://{SureTaxDomain}/SureTax/SSO/ExternalLogin/{ProviderId} - Initiate SSO — The SSO process begins when a user clicks a link or button in the Customer Portal that navigates to the SureTax SSO URL.
- Automatic redirect — After authentication with the IdP, users are automatically redirected to the SureTax Portal with an active session.
SureTax-Side Changes
Integration with Customer IdP
Integration with the customer's IdP in the SureTax Portal begins once the SureTax team receives the following from the customer:
- IdP authorization URL (or OIDC discovery endpoint)
- Client ID
- Client Secret
- Claim name mappings for user attributes
The SureTax team configures the IdP as a trusted external authentication provider within the SureTax Portal. This is a one-time setup performed by Wolters Kluwer during the implementation process.
Account & User Provisioning
SureTax supports two provisioning models for SSO users:
Pre-Provisioned Users
Manual SetupUser accounts are created in SureTax before the first SSO login. SureTax matches the email claim from the IdP token to the existing user record.
- Minimum claim: User email only
- Best for: Organizations that prefer to control user access and role assignments directly in SureTax
Auto-Provisioned (JIT)
Just-in-TimeSureTax automatically creates user accounts and (optionally) parent accounts the first time a user logs in via SSO.
- Best for: Organizations with large or frequently changing user bases
- Minimizes manual user management in SureTax
Claims Required for Account Creation
| Information | Description | Note |
|---|---|---|
| Account Name | Name of the parent account in SureTax platform. | Required |
| Organization Code | Unique identifier for the customer account. | Required |
| Notification Email | Email address of the account owner. | Optional — if not available, user email will be used |
Claims Required for User Creation
| Information | Description | Note |
|---|---|---|
| Username / Email | Email address of the user. | Required |
| First Name | First name of the user. | Required |
| Last Name | Last name of the user. | Required |
Security Considerations
The SSO integration between the Customer Portal and SureTax Portal follows security best practices:
| Consideration | Details |
|---|---|
| Protocol | OpenID Connect (OIDC) over TLS 1.2+. All communication is encrypted in transit. |
| Grant Type | Authorization Code flow — tokens are exchanged on the back channel, never exposed to the browser. |
| Token Validation | SureTax validates all tokens against the IdP's signing keys and verifies issuer, audience, and expiration claims. |
| Session Management | SureTax establishes its own session after successful SSO authentication. Session lifetime is configurable. |
| MFA Support | MFA is enforced by the customer's IdP. SureTax does not impose additional MFA requirements for SSO users since authentication is delegated to the IdP. |
| Secret Management | Client secrets are stored securely by both parties and should be rotated according to your organization's security policies. |
Troubleshooting
Common SSO integration issues and their resolutions:
| Issue | Possible Cause | Resolution |
|---|---|---|
| User redirected to IdP login page repeatedly | Redirect URI mismatch between SureTax configuration and IdP registration. | Verify the Redirect URI in your IdP matches exactly: https://{SureTaxDomain}/SureTax/signin-oidc-{providerid} |
| "Unauthorized" error after authentication | Client ID or Client Secret mismatch. | Verify the Client ID and Client Secret provided to SureTax match the values in your IdP's application registration. |
| User authenticated but not found in SureTax | User has not been pre-provisioned and auto-provisioning is not enabled. | Either create the user in SureTax before their first login, or enable auto-provisioning and ensure the required claims are included in the token. |
| Claims not received by SureTax | Token issuance policy does not include the required claims for the SureTax client application. | Review your IdP's token configuration and ensure the email, first name, last name (and account claims if using auto-provisioning) are included. |
| SSO works in test but fails in production | Different IdP endpoints or client credentials between environments. | Confirm that the production IdP discovery URL, Client ID, and Client Secret have been provided to the SureTax team for the production environment. |
Implementation Timeline
A typical SSO integration follows this timeline:
| Phase | Duration | Activities |
|---|---|---|
| Kickoff | Week 1 | SureTax provides Redirect URI and Application Name. Customer initiates IdP registration. |
| Configuration Exchange | Week 1–2 | Customer provides Client ID, Client Secret, IdP metadata, and claim mappings to SureTax. SureTax configures the IdP integration. |
| Testing | Week 2–3 | Joint testing in the SureTax sandbox environment. Validate authentication flow, claim mapping, and user provisioning. |
| Go-Live | Week 3–4 | Production configuration, final validation, and SSO activation. |
Summary
SureTax Portal SSO integration provides seamless, secure access to the SureTax Portal using your organization's existing identity infrastructure. By leveraging OpenID Connect, the integration ensures compatibility with all major identity providers while maintaining enterprise-grade security standards.
| Item | Details |
|---|---|
| Protocol | OpenID Connect (OIDC) |
| Grant Type | Authorization Code |
| Supported IdPs | Azure AD (Entra ID), Okta, Ping Identity, Auth0, and any OIDC-compliant provider |
| User Provisioning | Pre-provisioned or auto-provisioned (just-in-time) |
| Required Claims | User email (minimum); first name, last name, account name, org code for auto-provisioning |
| Typical Timeline | 2–4 weeks from kickoff to go-live |
For questions or to initiate SSO integration, contact your Wolters Kluwer implementation team.